
Free preflop poker charts (6-max and full ring)
Get the charts, free
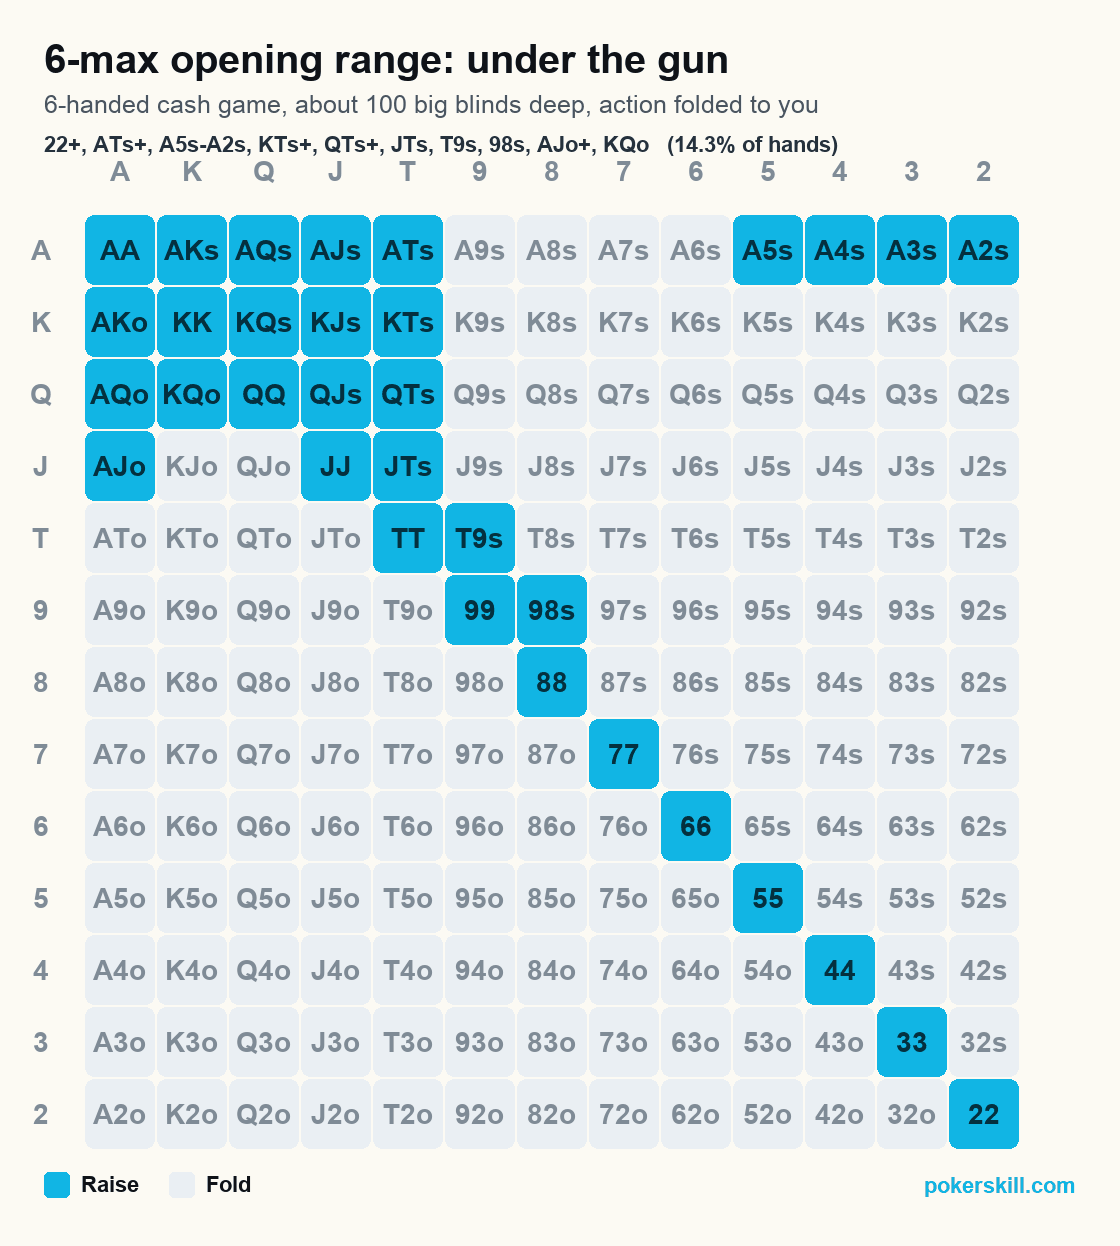
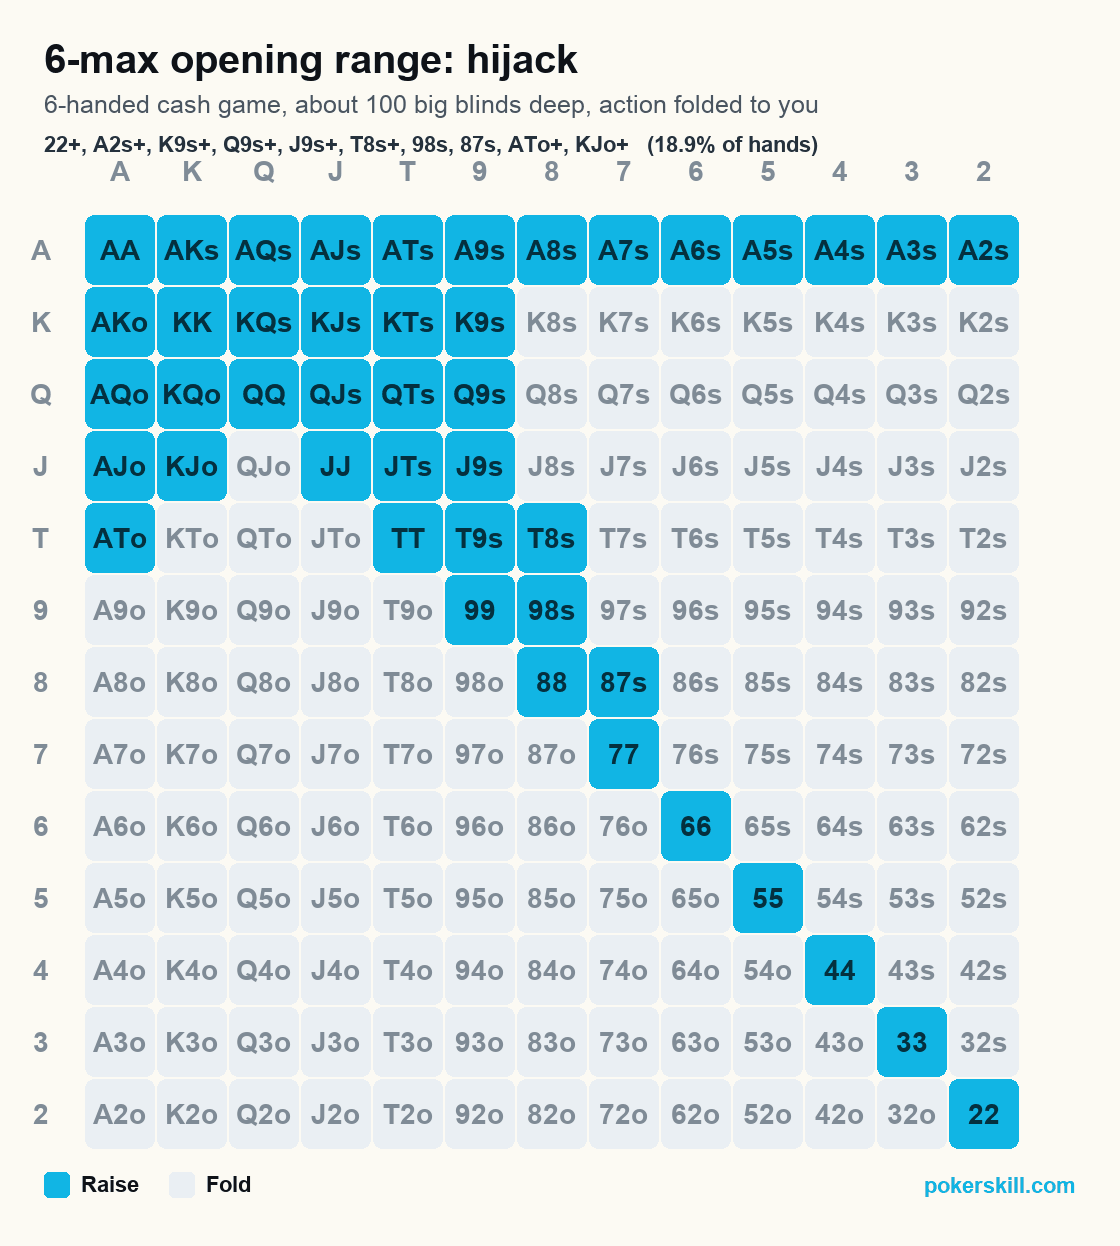
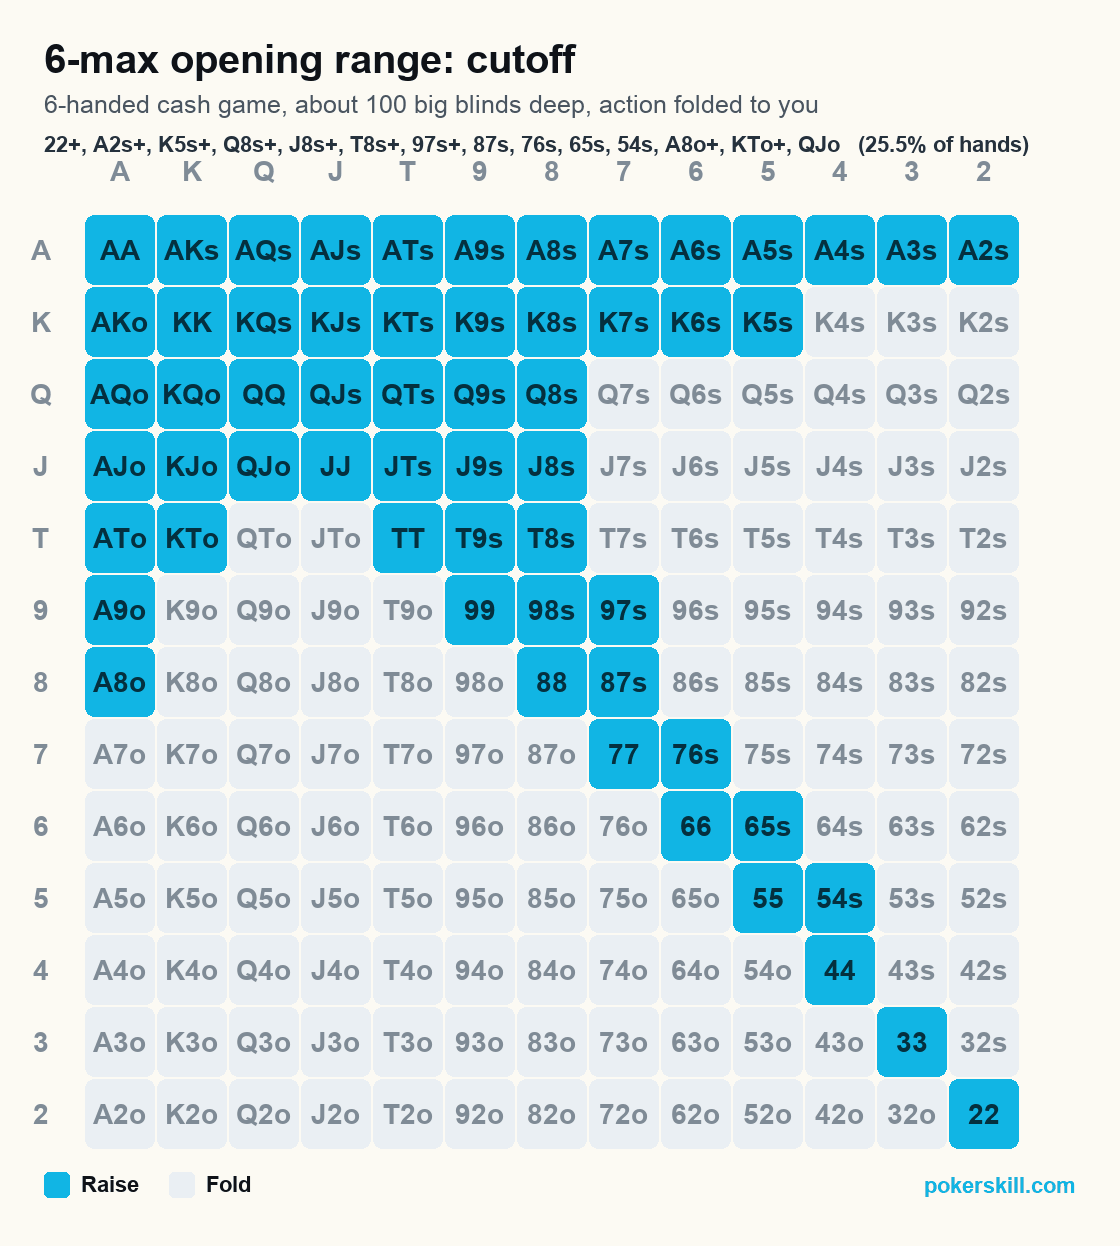
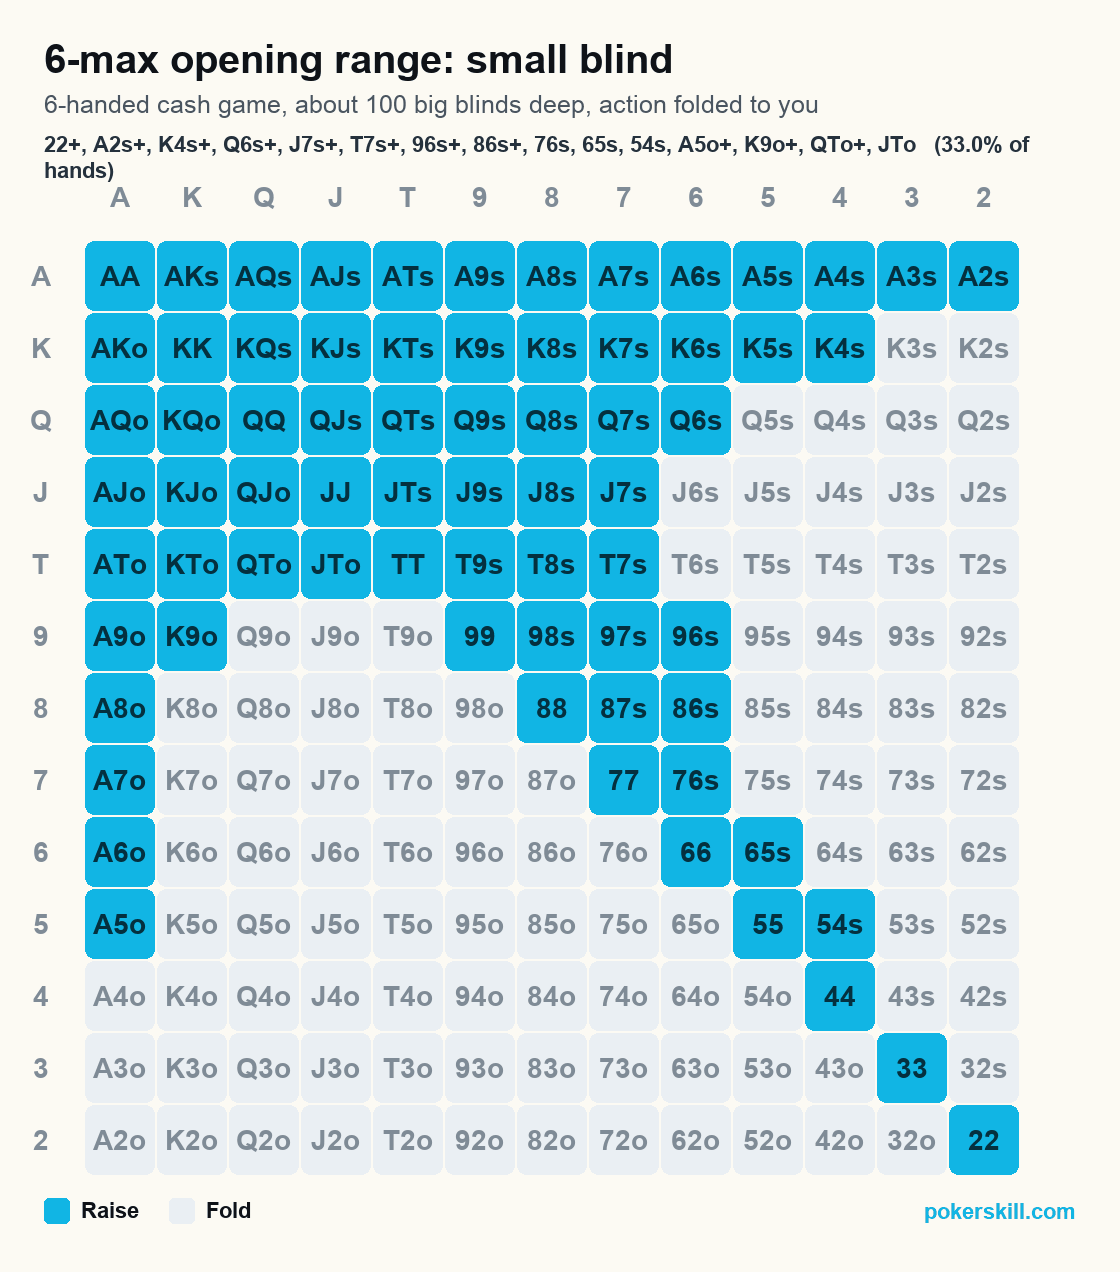
These are the starting hands you raise with when nobody has entered the pot yet, seat by seat, for 6-max and for full ring, plus a chart for what to do when someone raises in front of you. Every chart sits on this page as a table you can read and copy, and every chart downloads as a printable image. No email, no account, nothing held back. For one grid per seat including the blinds, see opening ranges by position.
One PDF holds the whole set, one chart to a page, sized so it still reads after you print it. Each chart below also has its own image link if you only want the seat you play most. Each seat you can open from, under the gun through the small blind, also has a Poker Skill lesson of its own, dealt with the pot unopened when the action reaches you.
| Chart | Hands played |
|---|---|
| Under the gun, 6-max | 14.3% |
| Hijack, 6-max | 18.9% |
| Cutoff, 6-max | 25.5% |
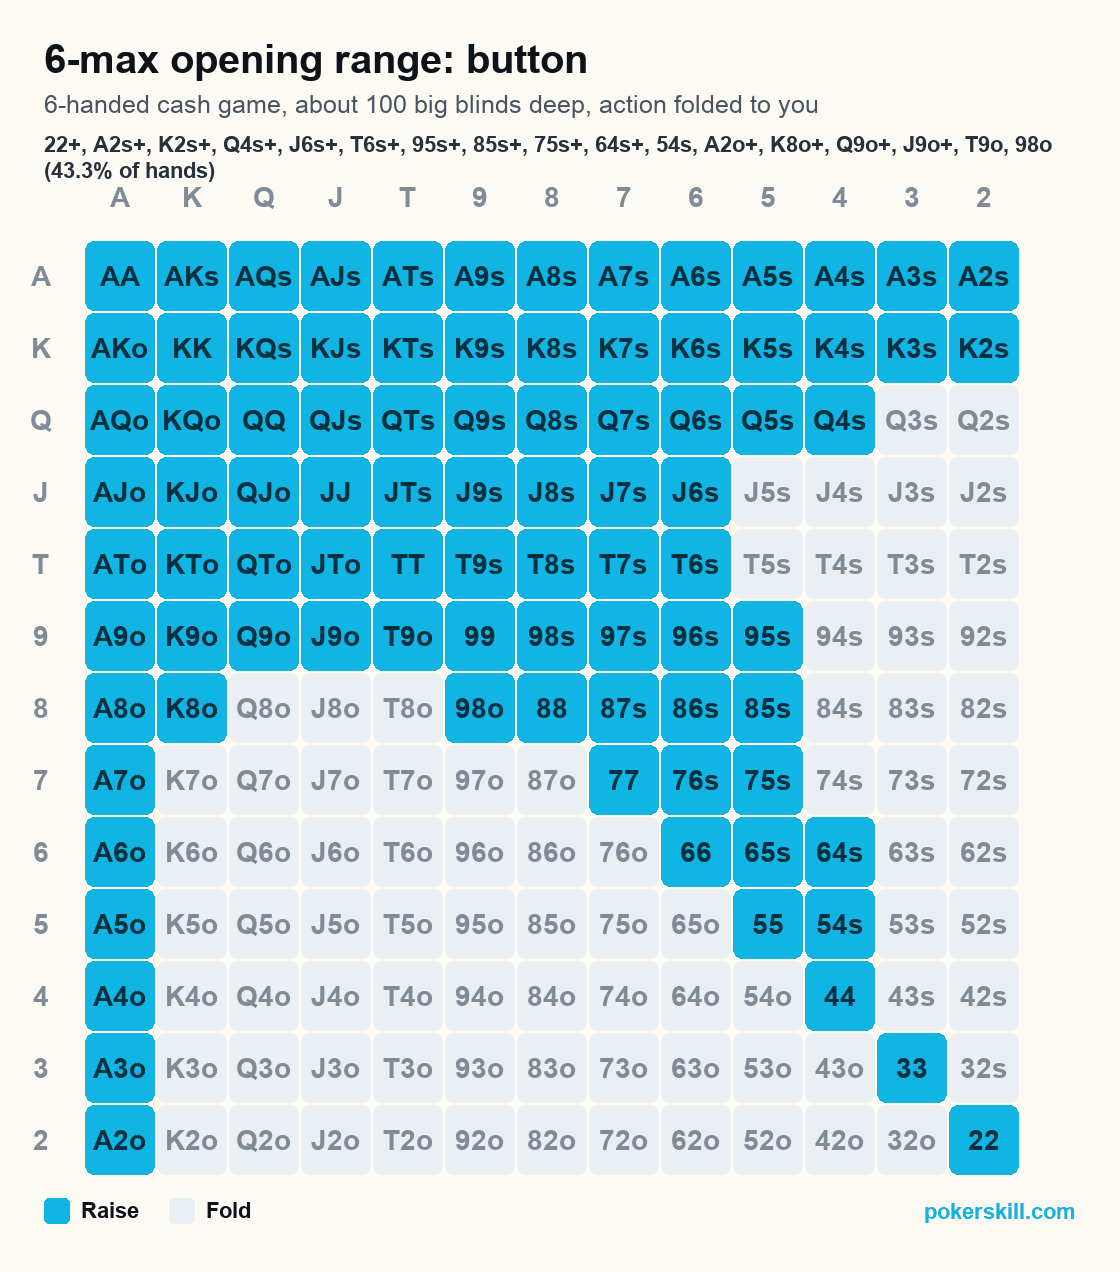
| Button, 6-max | 43.3% |
| Small blind, 6-max | 33.0% |
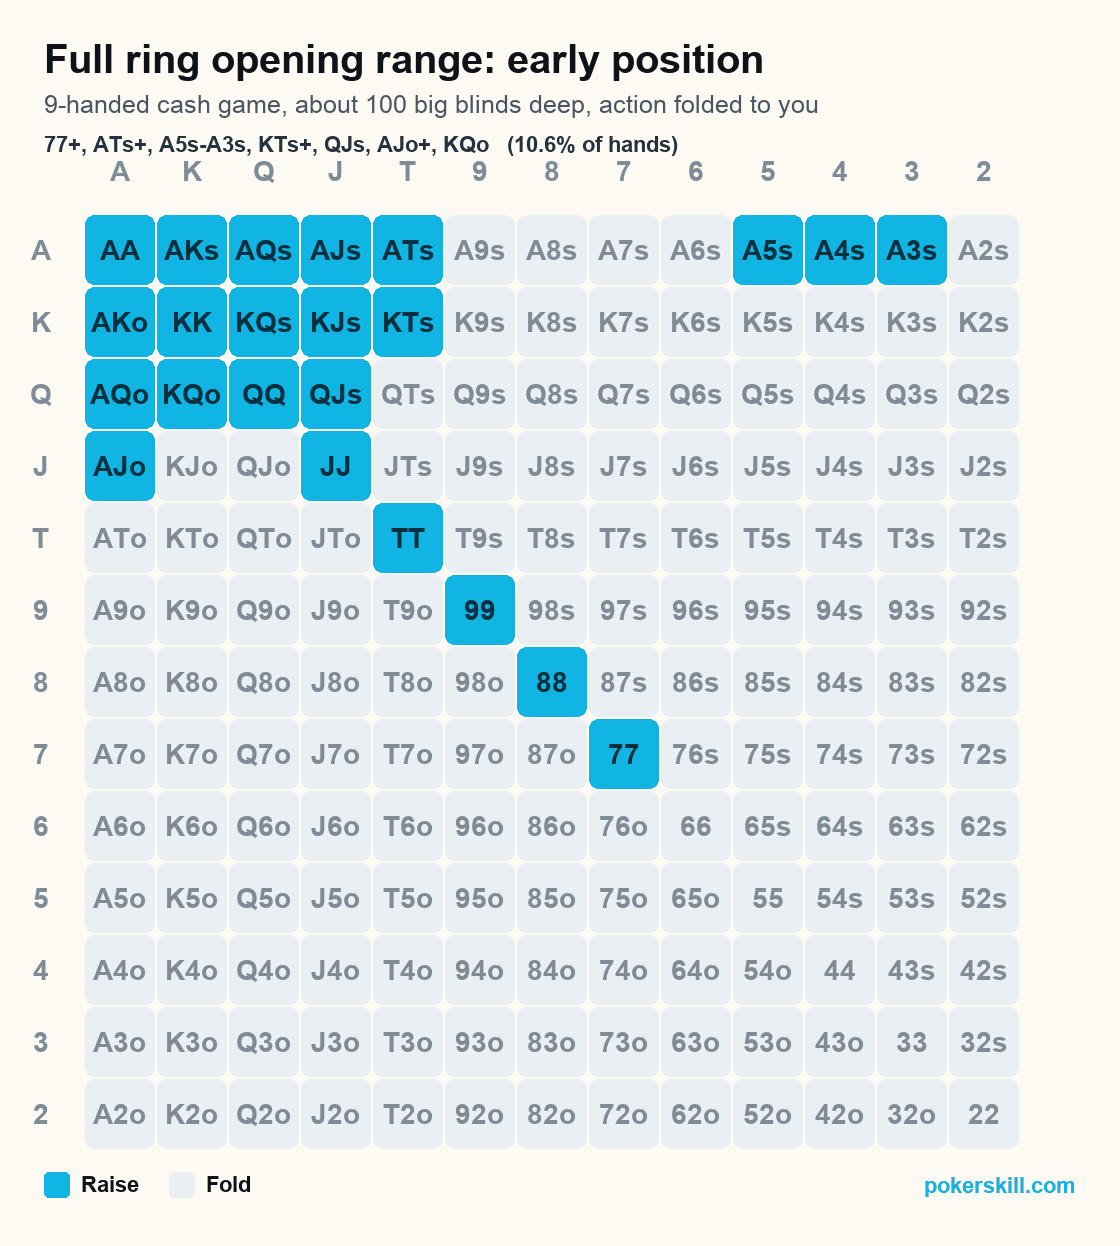
| Early position, full ring | 10.6% |
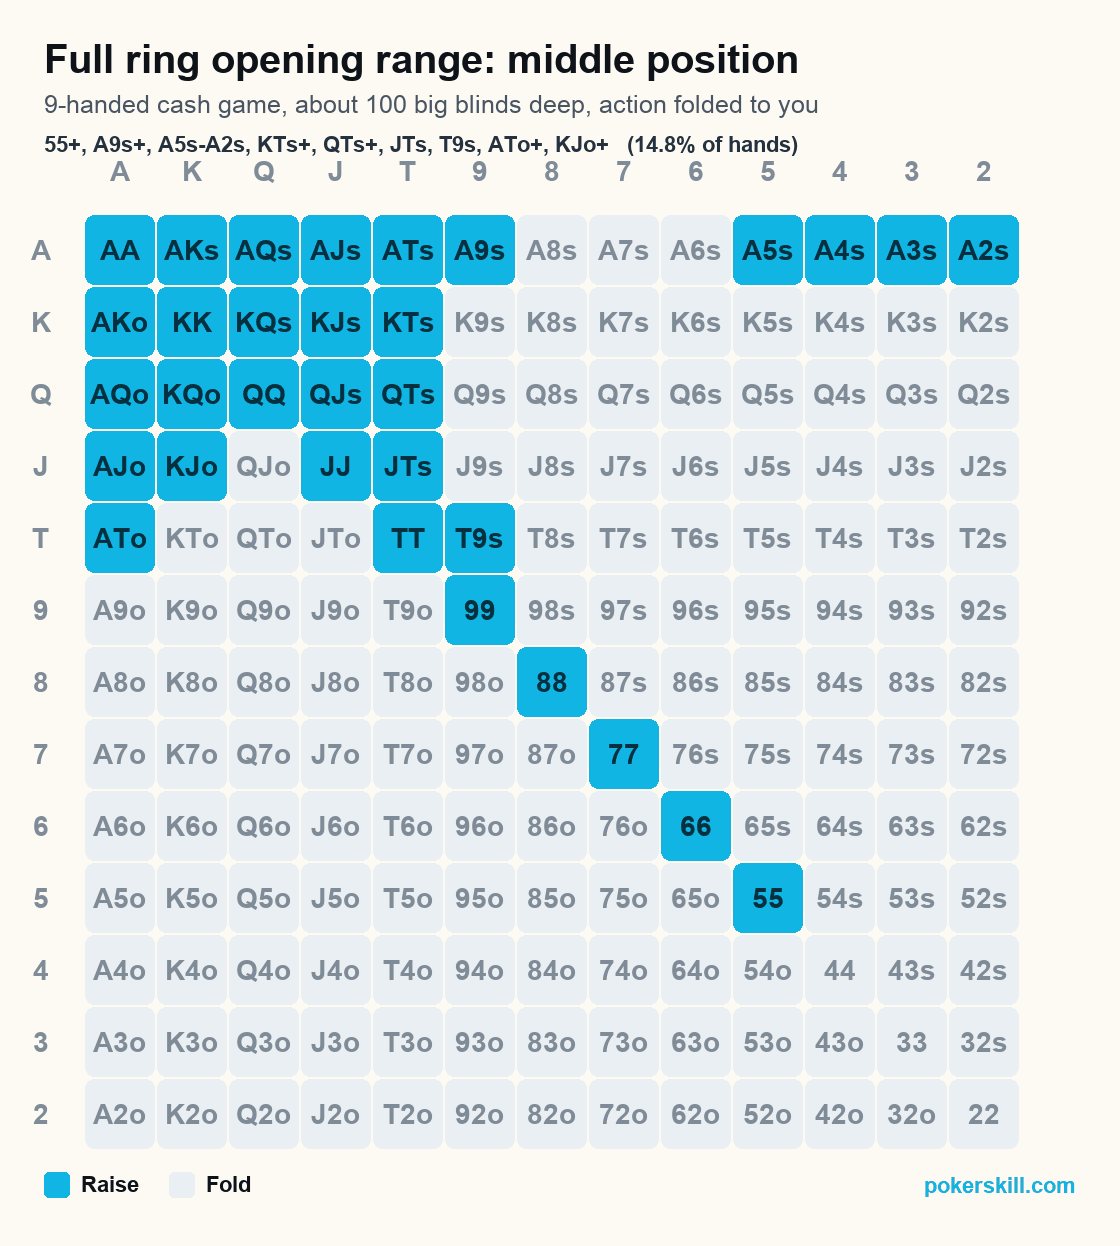
| Middle position, full ring | 14.8% |
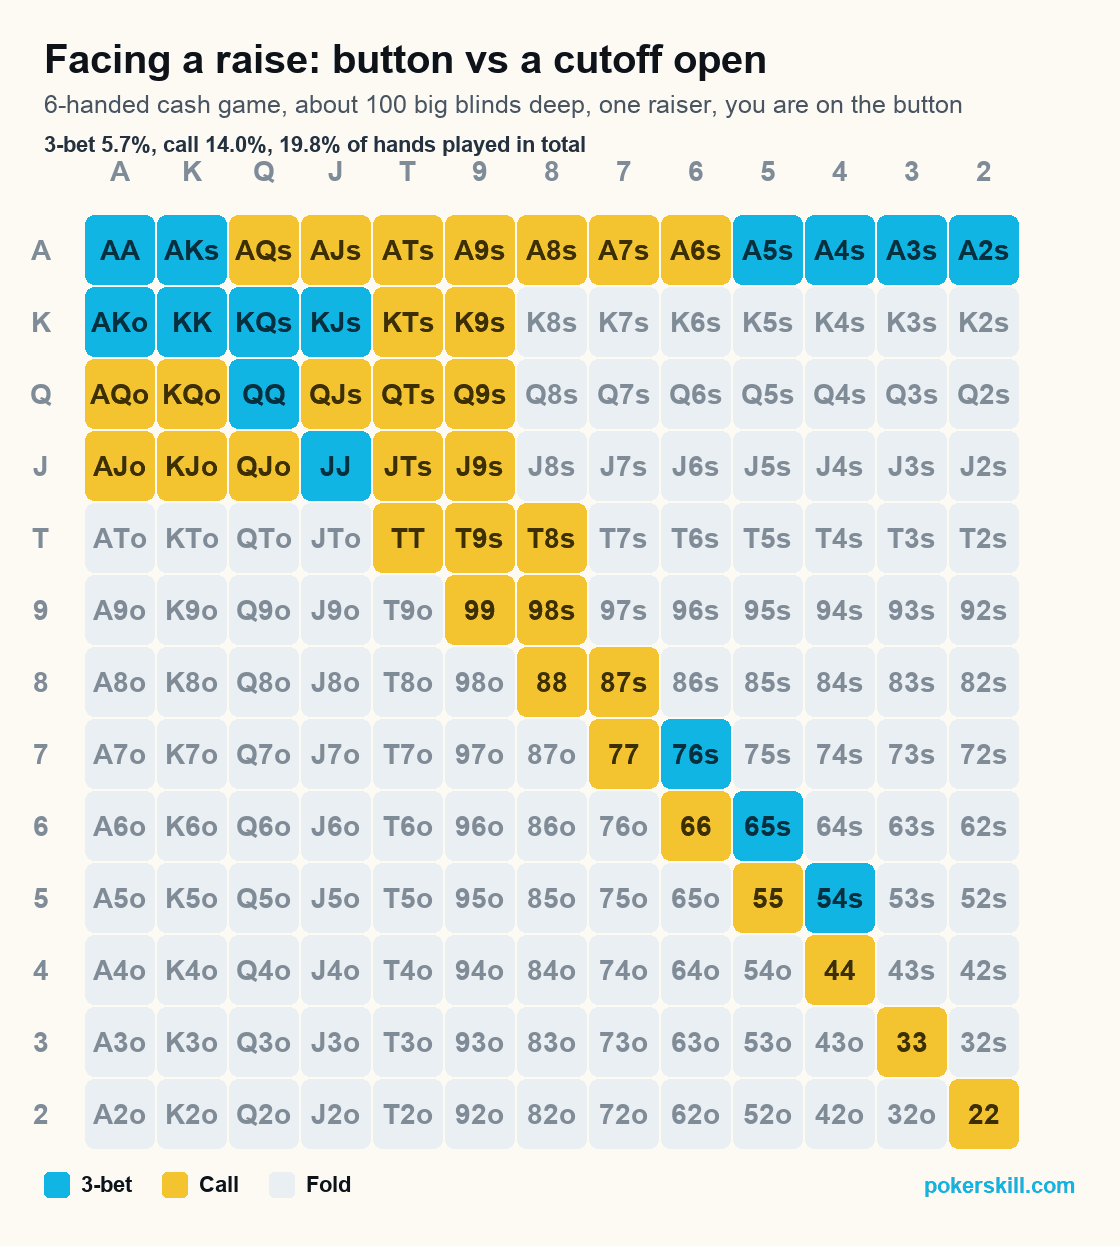
| Button vs a cutoff raise | 19.8% |
Drill these ranges in the app
Poker Skill turns these ranges into short daily reps and tells you why an answer was right. Free forever, no wagering.
6-max opening charts, by position
The action folds to you, the pot is unopened, and you are picking a starting hand to raise with. That is the spot these charts cover, and it is the one moment in a hand where a list of hands gets you most of the way to a good decision. Raise the hands in cyan, fold the rest, and use about 2.5 big blinds as your raise size from every seat except the small blind, where 3 big blinds is the usual default.
Watch what happens as the seats move. Under the gun opens about 14% of hands and the button opens about 43%. Same deck, same player, three times as many hands, because acting last for the rest of the hand is worth that much. If the seat names are new, the guide to poker positions covers them, RFI is the shorthand you will see for raising first in, and the set of hands a seat plays that way has its own name: an opening range.
Under the gun opening range
| A | K | Q | J | T | 9 | 8 | 7 | 6 | 5 | 4 | 3 | 2 | |
|---|---|---|---|---|---|---|---|---|---|---|---|---|---|
| A | AA | AKs | AQs | AJs | ATs | A9s | A8s | A7s | A6s | A5s | A4s | A3s | A2s |
| K | AKo | KK | KQs | KJs | KTs | K9s | K8s | K7s | K6s | K5s | K4s | K3s | K2s |
| Q | AQo | KQo | QJs | QTs | Q9s | Q8s | Q7s | Q6s | Q5s | Q4s | Q3s | Q2s | |
| J | AJo | KJo | QJo | JJ | JTs | J9s | J8s | J7s | J6s | J5s | J4s | J3s | J2s |
| T | ATo | KTo | QTo | JTo | TT | T9s | T8s | T7s | T6s | T5s | T4s | T3s | T2s |
| 9 | A9o | K9o | Q9o | J9o | T9o | 99 | 98s | 97s | 96s | 95s | 94s | 93s | 92s |
| 8 | A8o | K8o | Q8o | J8o | T8o | 98o | 88 | 87s | 86s | 85s | 84s | 83s | 82s |
| 7 | A7o | K7o | Q7o | J7o | T7o | 97o | 87o | 77 | 76s | 75s | 74s | 73s | 72s |
| 6 | A6o | K6o | Q6o | J6o | T6o | 96o | 86o | 76o | 66 | 65s | 64s | 63s | 62s |
| 5 | A5o | K5o | Q5o | J5o | T5o | 95o | 85o | 75o | 65o | 55 | 54s | 53s | 52s |
| 4 | A4o | K4o | Q4o | J4o | T4o | 94o | 84o | 74o | 64o | 54o | 44 | 43s | 42s |
| 3 | A3o | K3o | Q3o | J3o | T3o | 93o | 83o | 73o | 63o | 53o | 43o | 33 | 32s |
| 2 | A2o | K2o | Q2o | J2o | T2o | 92o | 82o | 72o | 62o | 52o | 42o | 32o | 22 |
- Raise
- Fold
- 14.3% of hands
Five players still get to act behind you, so this is the tightest seat at the table. Two things surprise people here. A5s through A2s are in the range while A9s through A6s are out, because the wheel aces make straights and nut flushes and block the aces someone behind you might hold. And KJo, ATo, and QJo are folds, even though they feel like real hands, because they are exactly the hands that get you into trouble against the range that keeps playing.
Hijack opening range
| A | K | Q | J | T | 9 | 8 | 7 | 6 | 5 | 4 | 3 | 2 | |
|---|---|---|---|---|---|---|---|---|---|---|---|---|---|
| A | AA | AKs | AQs | AJs | ATs | A9s | A8s | A7s | A6s | A5s | A4s | A3s | A2s |
| K | AKo | KK | KQs | KJs | KTs | K9s | K8s | K7s | K6s | K5s | K4s | K3s | K2s |
| Q | AQo | KQo | QJs | QTs | Q9s | Q8s | Q7s | Q6s | Q5s | Q4s | Q3s | Q2s | |
| J | AJo | KJo | QJo | JJ | JTs | J9s | J8s | J7s | J6s | J5s | J4s | J3s | J2s |
| T | ATo | KTo | QTo | JTo | TT | T9s | T8s | T7s | T6s | T5s | T4s | T3s | T2s |
| 9 | A9o | K9o | Q9o | J9o | T9o | 99 | 98s | 97s | 96s | 95s | 94s | 93s | 92s |
| 8 | A8o | K8o | Q8o | J8o | T8o | 98o | 88 | 87s | 86s | 85s | 84s | 83s | 82s |
| 7 | A7o | K7o | Q7o | J7o | T7o | 97o | 87o | 77 | 76s | 75s | 74s | 73s | 72s |
| 6 | A6o | K6o | Q6o | J6o | T6o | 96o | 86o | 76o | 66 | 65s | 64s | 63s | 62s |
| 5 | A5o | K5o | Q5o | J5o | T5o | 95o | 85o | 75o | 65o | 55 | 54s | 53s | 52s |
| 4 | A4o | K4o | Q4o | J4o | T4o | 94o | 84o | 74o | 64o | 54o | 44 | 43s | 42s |
| 3 | A3o | K3o | Q3o | J3o | T3o | 93o | 83o | 73o | 63o | 53o | 43o | 33 | 32s |
| 2 | A2o | K2o | Q2o | J2o | T2o | 92o | 82o | 72o | 62o | 52o | 42o | 32o | 22 |
- Raise
- Fold
- 18.9% of hands
One seat later, one fewer player to get through, and the range grows to about 19%. The additions are the ones you would guess: every suited ace, one more step down each suited run (K9s, Q9s, J9s, T8s, and 87s), and the two offsuit broadways that were close calls under the gun, ATo and KJo. Nothing here is a big leap. Each seat you move gains you a little more room, and the chart is just keeping score of it.
Cutoff opening range
| A | K | Q | J | T | 9 | 8 | 7 | 6 | 5 | 4 | 3 | 2 | |
|---|---|---|---|---|---|---|---|---|---|---|---|---|---|
| A | AA | AKs | AQs | AJs | ATs | A9s | A8s | A7s | A6s | A5s | A4s | A3s | A2s |
| K | AKo | KK | KQs | KJs | KTs | K9s | K8s | K7s | K6s | K5s | K4s | K3s | K2s |
| Q | AQo | KQo | QJs | QTs | Q9s | Q8s | Q7s | Q6s | Q5s | Q4s | Q3s | Q2s | |
| J | AJo | KJo | QJo | JJ | JTs | J9s | J8s | J7s | J6s | J5s | J4s | J3s | J2s |
| T | ATo | KTo | QTo | JTo | TT | T9s | T8s | T7s | T6s | T5s | T4s | T3s | T2s |
| 9 | A9o | K9o | Q9o | J9o | T9o | 99 | 98s | 97s | 96s | 95s | 94s | 93s | 92s |
| 8 | A8o | K8o | Q8o | J8o | T8o | 98o | 88 | 87s | 86s | 85s | 84s | 83s | 82s |
| 7 | A7o | K7o | Q7o | J7o | T7o | 97o | 87o | 77 | 76s | 75s | 74s | 73s | 72s |
| 6 | A6o | K6o | Q6o | J6o | T6o | 96o | 86o | 76o | 66 | 65s | 64s | 63s | 62s |
| 5 | A5o | K5o | Q5o | J5o | T5o | 95o | 85o | 75o | 65o | 55 | 54s | 53s | 52s |
| 4 | A4o | K4o | Q4o | J4o | T4o | 94o | 84o | 74o | 64o | 54o | 44 | 43s | 42s |
| 3 | A3o | K3o | Q3o | J3o | T3o | 93o | 83o | 73o | 63o | 53o | 43o | 33 | 32s |
| 2 | A2o | K2o | Q2o | J2o | T2o | 92o | 82o | 72o | 62o | 52o | 42o | 32o | 22 |
- Raise
- Fold
- 25.5% of hands
At about 26% of hands, the cutoff is where stealing starts to be a real part of your game. Only three players are left, and two of them are posting blinds they would rather keep. This is also where suited connectors earn their seat: 54s, 65s, and 76s play well when you take the betting lead and they flop the kind of hands nobody puts you on.
Button opening range
| A | K | Q | J | T | 9 | 8 | 7 | 6 | 5 | 4 | 3 | 2 | |
|---|---|---|---|---|---|---|---|---|---|---|---|---|---|
| A | AA | AKs | AQs | AJs | ATs | A9s | A8s | A7s | A6s | A5s | A4s | A3s | A2s |
| K | AKo | KK | KQs | KJs | KTs | K9s | K8s | K7s | K6s | K5s | K4s | K3s | K2s |
| Q | AQo | KQo | QJs | QTs | Q9s | Q8s | Q7s | Q6s | Q5s | Q4s | Q3s | Q2s | |
| J | AJo | KJo | QJo | JJ | JTs | J9s | J8s | J7s | J6s | J5s | J4s | J3s | J2s |
| T | ATo | KTo | QTo | JTo | TT | T9s | T8s | T7s | T6s | T5s | T4s | T3s | T2s |
| 9 | A9o | K9o | Q9o | J9o | T9o | 99 | 98s | 97s | 96s | 95s | 94s | 93s | 92s |
| 8 | A8o | K8o | Q8o | J8o | T8o | 98o | 88 | 87s | 86s | 85s | 84s | 83s | 82s |
| 7 | A7o | K7o | Q7o | J7o | T7o | 97o | 87o | 77 | 76s | 75s | 74s | 73s | 72s |
| 6 | A6o | K6o | Q6o | J6o | T6o | 96o | 86o | 76o | 66 | 65s | 64s | 63s | 62s |
| 5 | A5o | K5o | Q5o | J5o | T5o | 95o | 85o | 75o | 65o | 55 | 54s | 53s | 52s |
| 4 | A4o | K4o | Q4o | J4o | T4o | 94o | 84o | 74o | 64o | 54o | 44 | 43s | 42s |
| 3 | A3o | K3o | Q3o | J3o | T3o | 93o | 83o | 73o | 63o | 53o | 43o | 33 | 32s |
| 2 | A2o | K2o | Q2o | J2o | T2o | 92o | 82o | 72o | 62o | 52o | 42o | 32o | 22 |
- Raise
- Fold
- 43.3% of hands
About 43% of all hands, and the widest chart in the set. You act after both blinds on every street that follows, and two players are all that stand between you and the pot. The offsuit side of the grid opens up further here: A2o, K8o, Q9o, and J9o are raises on the button that would be quick folds three seats earlier.
Small blind opening range
| A | K | Q | J | T | 9 | 8 | 7 | 6 | 5 | 4 | 3 | 2 | |
|---|---|---|---|---|---|---|---|---|---|---|---|---|---|
| A | AA | AKs | AQs | AJs | ATs | A9s | A8s | A7s | A6s | A5s | A4s | A3s | A2s |
| K | AKo | KK | KQs | KJs | KTs | K9s | K8s | K7s | K6s | K5s | K4s | K3s | K2s |
| Q | AQo | KQo | QJs | QTs | Q9s | Q8s | Q7s | Q6s | Q5s | Q4s | Q3s | Q2s | |
| J | AJo | KJo | QJo | JJ | JTs | J9s | J8s | J7s | J6s | J5s | J4s | J3s | J2s |
| T | ATo | KTo | QTo | JTo | TT | T9s | T8s | T7s | T6s | T5s | T4s | T3s | T2s |
| 9 | A9o | K9o | Q9o | J9o | T9o | 99 | 98s | 97s | 96s | 95s | 94s | 93s | 92s |
| 8 | A8o | K8o | Q8o | J8o | T8o | 98o | 88 | 87s | 86s | 85s | 84s | 83s | 82s |
| 7 | A7o | K7o | Q7o | J7o | T7o | 97o | 87o | 77 | 76s | 75s | 74s | 73s | 72s |
| 6 | A6o | K6o | Q6o | J6o | T6o | 96o | 86o | 76o | 66 | 65s | 64s | 63s | 62s |
| 5 | A5o | K5o | Q5o | J5o | T5o | 95o | 85o | 75o | 65o | 55 | 54s | 53s | 52s |
| 4 | A4o | K4o | Q4o | J4o | T4o | 94o | 84o | 74o | 64o | 54o | 44 | 43s | 42s |
| 3 | A3o | K3o | Q3o | J3o | T3o | 93o | 83o | 73o | 63o | 53o | 43o | 33 | 32s |
| 2 | A2o | K2o | Q2o | J2o | T2o | 92o | 82o | 72o | 62o | 52o | 42o | 32o | 22 |
- Raise
- Fold
- 33.0% of hands
Only the big blind is left, so you get to attack one player. The catch is that you play every later street out of position, which is why this chart is tighter than the button at about 33% and why the usual raise size here is 3 big blinds rather than 2.5. Worth knowing: poker writers genuinely disagree about this seat. Some teach the raise-or-fold chart you see here, others teach a strategy that mixes in limps with the weaker playable hands. Raise-or-fold is the simpler habit to build, and it is the one this chart takes.
Facing a raise: 3-bet, call, or fold
Once somebody raises, the opening charts stop applying. Your decision is now three-way, and the answer depends on who raised and where you are sitting. The chart below covers the most common version of the spot: you are on the button, the cutoff has opened, and everyone else has folded. A 3-bet from here is usually around 8.5 big blinds when you have position and around 10 when you do not. The 3-bet range charts take this spot further, with the same grid plus a blind facing an early-position open.
| A | K | Q | J | T | 9 | 8 | 7 | 6 | 5 | 4 | 3 | 2 | |
|---|---|---|---|---|---|---|---|---|---|---|---|---|---|
| A | AA | AKs | AQs | AJs | ATs | A9s | A8s | A7s | A6s | A5s | A4s | A3s | A2s |
| K | AKo | KK | KQs | KJs | KTs | K9s | K8s | K7s | K6s | K5s | K4s | K3s | K2s |
| Q | AQo | KQo | QJs | QTs | Q9s | Q8s | Q7s | Q6s | Q5s | Q4s | Q3s | Q2s | |
| J | AJo | KJo | QJo | JJ | JTs | J9s | J8s | J7s | J6s | J5s | J4s | J3s | J2s |
| T | ATo | KTo | QTo | JTo | TT | T9s | T8s | T7s | T6s | T5s | T4s | T3s | T2s |
| 9 | A9o | K9o | Q9o | J9o | T9o | 99 | 98s | 97s | 96s | 95s | 94s | 93s | 92s |
| 8 | A8o | K8o | Q8o | J8o | T8o | 98o | 88 | 87s | 86s | 85s | 84s | 83s | 82s |
| 7 | A7o | K7o | Q7o | J7o | T7o | 97o | 87o | 77 | 76s | 75s | 74s | 73s | 72s |
| 6 | A6o | K6o | Q6o | J6o | T6o | 96o | 86o | 76o | 66 | 65s | 64s | 63s | 62s |
| 5 | A5o | K5o | Q5o | J5o | T5o | 95o | 85o | 75o | 65o | 55 | 54s | 53s | 52s |
| 4 | A4o | K4o | Q4o | J4o | T4o | 94o | 84o | 74o | 64o | 54o | 44 | 43s | 42s |
| 3 | A3o | K3o | Q3o | J3o | T3o | 93o | 83o | 73o | 63o | 53o | 43o | 33 | 32s |
| 2 | A2o | K2o | Q2o | J2o | T2o | 92o | 82o | 72o | 62o | 52o | 42o | 32o | 22 |
- 3-bet
- Call
- Fold
- 19.8% of hands played
3-betting: value hands and bluff hands
A 3-betting range has two halves. The value half raises because you expect to be ahead when the money goes in: JJ and better plus AK against a cutoff open, tightening to QQ and better plus AK when the raise came from an earlier seat, because earlier seats raise stronger ranges. The bluff half raises for the opposite reason, and it is chosen for what the hands do when they get called: A5s through A2s, KQs and KJs, and 76s through 54s. They block the hands that continue, they make nutted hands when they connect, and they cost you little when they miss.
| They opened from | 3-bet for value | 3-bet as a bluff |
|---|---|---|
| Cutoff or button | JJ+, AK | A5s-A2s, KQs, KJs, 76s, 65s, 54s |
| Hijack or earlier | QQ+, AK | A5s-A2s, KQs, and fewer of the small suited connectors |
| A player who never folds | Your value hands only | None. Bluffing a station is lighting money on fire |
Calling a raise: which hands, which seats
Calling is for hands that play well after the flop but are not strong enough to want a bigger pot right now: pairs from TT down to 22, suited broadways, AQs and AJs, and the suited connectors you did not turn into bluffs. Position decides how many of them you can keep. On the button you can call the whole list above, roughly 14% of hands, because you act last on every street that matters.
The blinds are a different story. In the big blind you are already invested, so you get a price that lets you continue wider than any other seat, and calling is usually better than 3-betting with your medium hands there. The small blind is the worst place to call a raise, because the big blind is still behind you and you are out of position to everyone for the rest of the hand. Face a cutoff raise there in Poker Skill's lessons and the right answer is never a call. When in doubt from the small blind, 3-bet or fold.
Check yourself. 6-max, 100 big blinds, the cutoff opens to 2.5 and folds to you on the button. You look down at K♦ J♦. 3-bet, call, or fold?
Show the answer
3-bet. King-jack suited is in the bluff half of this page’s published button 3-betting range against a cutoff open, alongside A5s down to A2s, KQs and the small suited connectors. It is not a value raise and it is not meant to be: it takes a king away from the hands that continue, and it makes the second nut flush when it connects. Calling is the common mistake here, and it hands the cutoff the pot they raised for.
Full ring charts: what changes at a 9-handed table
Add three players and every early seat gets worse. There are simply more hands behind you that can be better than yours, so the front of the table tightens hard while the cutoff and button stay close to their 6-max charts. If you play live, this is your table.
Early position (9-handed) opening range
| A | K | Q | J | T | 9 | 8 | 7 | 6 | 5 | 4 | 3 | 2 | |
|---|---|---|---|---|---|---|---|---|---|---|---|---|---|
| A | AA | AKs | AQs | AJs | ATs | A9s | A8s | A7s | A6s | A5s | A4s | A3s | A2s |
| K | AKo | KK | KQs | KJs | KTs | K9s | K8s | K7s | K6s | K5s | K4s | K3s | K2s |
| Q | AQo | KQo | QJs | QTs | Q9s | Q8s | Q7s | Q6s | Q5s | Q4s | Q3s | Q2s | |
| J | AJo | KJo | QJo | JJ | JTs | J9s | J8s | J7s | J6s | J5s | J4s | J3s | J2s |
| T | ATo | KTo | QTo | JTo | TT | T9s | T8s | T7s | T6s | T5s | T4s | T3s | T2s |
| 9 | A9o | K9o | Q9o | J9o | T9o | 99 | 98s | 97s | 96s | 95s | 94s | 93s | 92s |
| 8 | A8o | K8o | Q8o | J8o | T8o | 98o | 88 | 87s | 86s | 85s | 84s | 83s | 82s |
| 7 | A7o | K7o | Q7o | J7o | T7o | 97o | 87o | 77 | 76s | 75s | 74s | 73s | 72s |
| 6 | A6o | K6o | Q6o | J6o | T6o | 96o | 86o | 76o | 66 | 65s | 64s | 63s | 62s |
| 5 | A5o | K5o | Q5o | J5o | T5o | 95o | 85o | 75o | 65o | 55 | 54s | 53s | 52s |
| 4 | A4o | K4o | Q4o | J4o | T4o | 94o | 84o | 74o | 64o | 54o | 44 | 43s | 42s |
| 3 | A3o | K3o | Q3o | J3o | T3o | 93o | 83o | 73o | 63o | 53o | 43o | 33 | 32s |
| 2 | A2o | K2o | Q2o | J2o | T2o | 92o | 82o | 72o | 62o | 52o | 42o | 32o | 22 |
- Raise
- Fold
- 10.6% of hands
About 11% of hands: big pairs, the strong suited aces and kings, and four offsuit broadways. Poker books have been strict about the front of a full ring table for decades, and the reason has not changed. Eight players get to act after you, and the ones who keep playing are not doing it with junk.
Middle position (9-handed) opening range
| A | K | Q | J | T | 9 | 8 | 7 | 6 | 5 | 4 | 3 | 2 | |
|---|---|---|---|---|---|---|---|---|---|---|---|---|---|
| A | AA | AKs | AQs | AJs | ATs | A9s | A8s | A7s | A6s | A5s | A4s | A3s | A2s |
| K | AKo | KK | KQs | KJs | KTs | K9s | K8s | K7s | K6s | K5s | K4s | K3s | K2s |
| Q | AQo | KQo | QJs | QTs | Q9s | Q8s | Q7s | Q6s | Q5s | Q4s | Q3s | Q2s | |
| J | AJo | KJo | QJo | JJ | JTs | J9s | J8s | J7s | J6s | J5s | J4s | J3s | J2s |
| T | ATo | KTo | QTo | JTo | TT | T9s | T8s | T7s | T6s | T5s | T4s | T3s | T2s |
| 9 | A9o | K9o | Q9o | J9o | T9o | 99 | 98s | 97s | 96s | 95s | 94s | 93s | 92s |
| 8 | A8o | K8o | Q8o | J8o | T8o | 98o | 88 | 87s | 86s | 85s | 84s | 83s | 82s |
| 7 | A7o | K7o | Q7o | J7o | T7o | 97o | 87o | 77 | 76s | 75s | 74s | 73s | 72s |
| 6 | A6o | K6o | Q6o | J6o | T6o | 96o | 86o | 76o | 66 | 65s | 64s | 63s | 62s |
| 5 | A5o | K5o | Q5o | J5o | T5o | 95o | 85o | 75o | 65o | 55 | 54s | 53s | 52s |
| 4 | A4o | K4o | Q4o | J4o | T4o | 94o | 84o | 74o | 64o | 54o | 44 | 43s | 42s |
| 3 | A3o | K3o | Q3o | J3o | T3o | 93o | 83o | 73o | 63o | 53o | 43o | 33 | 32s |
| 2 | A2o | K2o | Q2o | J2o | T2o | 92o | 82o | 72o | 62o | 52o | 42o | 32o | 22 |
- Raise
- Fold
- 14.8% of hands
Around 15%, and the small pairs come back. From the hijack onward at a 9-handed table, the 6-max charts above are close enough to use as they are, which is why this set stops here rather than repeating four nearly identical grids.
How to read a preflop chart
Every chart on this page is the same 13 by 13 square, and once you can read one you can read all of them. Your two cards live in exactly one box.
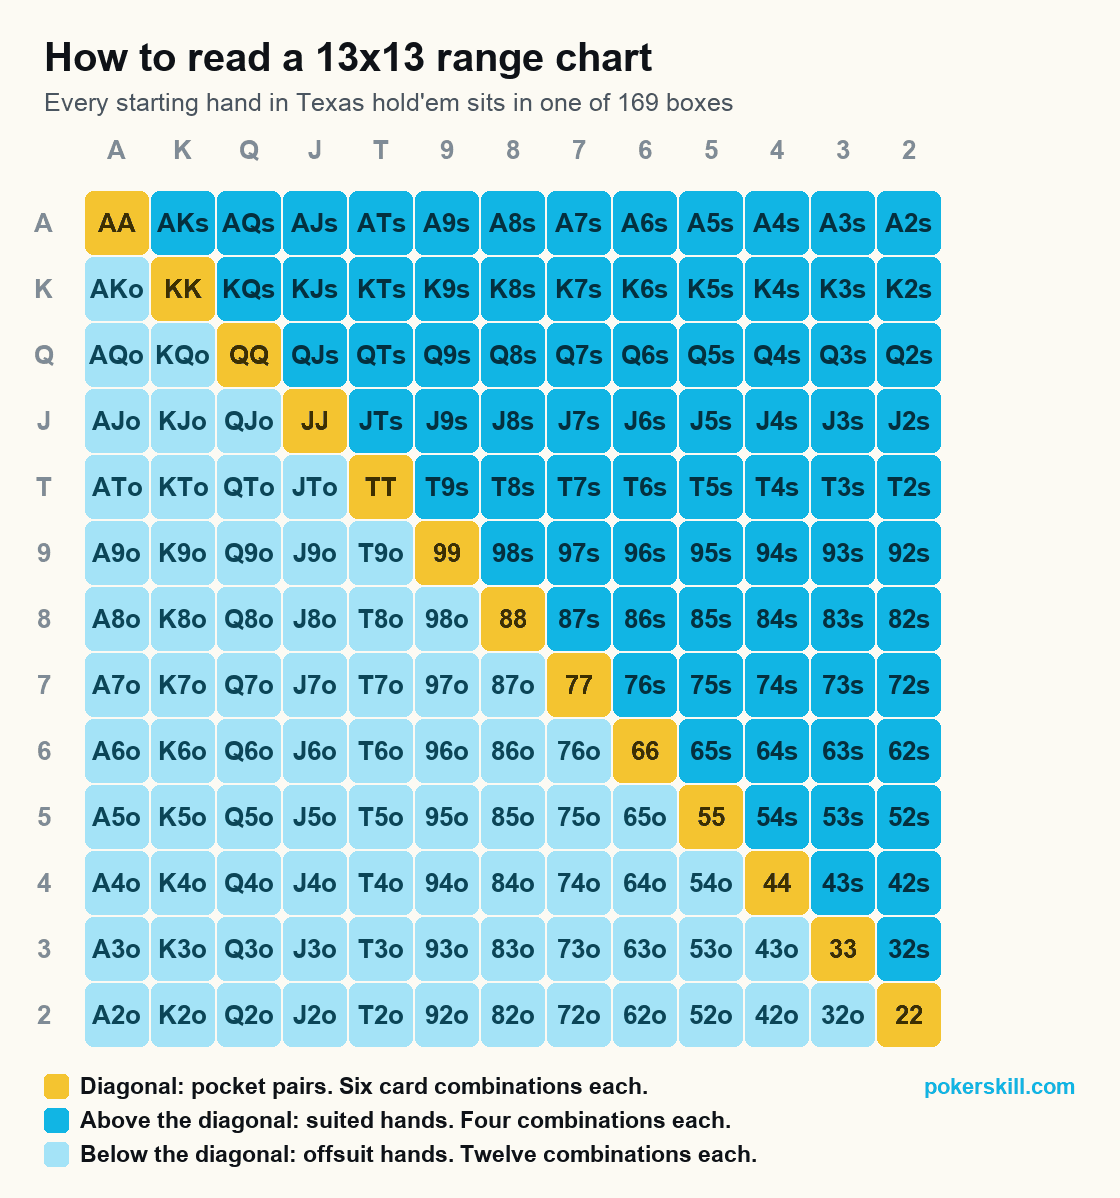
Pocket pairs run down the diagonal, from AA in the top left to 22 in the bottom right. Everything above the diagonal is suited, so AKs sits one box right of AA. Everything below the diagonal is offsuit, so AKo sits one box under it. The percentages you see under each chart are not the share of boxes colored in, they are the share of actual card combinations, and the two are different: each pair is 6 combinations, each suited hand is 4, each offsuit hand is 12. That is why a chart can look half full and still only play a quarter of your hands. Ranges get their own guide if you want the longer version.
How to actually use these charts
A chart answers one question: what do you do with this hand, from this seat, when the action comes to you unopened. That is a real question and it comes up every orbit, which is why the chart is worth having. It is also the limit of what a chart can do. Everything else that happens preflop is judgment, and nobody who wrote a chart thinks you should follow it while the table burns down around you.
When should you deviate from the chart?
Three situations come up often enough to name, and each one breaks a different assumption the chart was built on.
| What happened | The assumption it breaks | What to do instead |
|---|---|---|
| Somebody limped | That the pot was unopened | Wider against a limper who folds, tighter and for value against one who calls everything. Size up either way: a limped pot rewards more than 2.5 big blinds. |
| The table opens huge | That a raise costs about 2.5 big blinds | Defend tighter, because every call and 3-bet costs twice as much. To play more hands, shrink your own raises rather than raising bigger with worse cards. |
| The players are not average | That the seats behind you play a normal range | Wider against a table that folds to everything, tighter and for value against one that calls everything. That is the whole idea of an exploitative adjustment, and it is worth more than any extra chart. |
How do you memorize preflop charts?
Not hand by hand. Learn the shape instead: four blocks, the same four in every chart here, and then the hands on your seat’s edges. The blocks, the boundary hands and the full seat-by-seat drill schedule are on how to memorize preflop ranges, and our comparison of the best poker training apps covers which tool suits which player.
Practice these ranges
The charts are complete and they are yours. What they cannot do is make the decision automatic, and preflop is a speed test more than a knowledge test: you get a few seconds, several times an orbit, for the rest of your poker life. Poker Skill drills these exact decisions in short daily reps and tells you why an answer was right, so the chart stops being something you look up and starts being something you know. Free forever, no wagering.
Preflop chart FAQ
Five questions, answered. If you came here wanting to know which hand wins at showdown rather than which hand to raise before the flop, that is a different chart: the poker hand rankings chart has the ranking of made hands.
Is there a printable preflop chart PDF?
Yes. The PDF at the top of this page holds the whole set, one chart to a page, sized so it still reads after you print it. Every chart also downloads on its own as a PNG if you only want the seat you play most. Neither format asks for an email address.
What is the best preflop chart?
The one that matches your game. A chart is built for a specific table size, stack depth, and raise size, and it stops being right when any of those change. The charts here are built for cash games around 100 big blinds deep, 6-handed and 9-handed. If you are short in a tournament, the right chart is a push/fold chart instead, because under about 12 big blinds your real choice is all-in or fold.
Are preflop charts GTO?
These are simplified teaching ranges, not solver output. A solver plays some hands at partial frequencies, raising KTo a third of the time and folding it the rest, which is unusable at a real table and unreadable on a printed page. The charts here round those decisions to always or never. If you want the longer answer, including what the GTO label actually promises and where it stops being true, we wrote it up on GTO poker charts.
What percentage of hands should you play preflop?
Winning 6-max cash players tend to enter the pot with something like 18% to 25% of their hands overall. That is an average across every seat, not a target for any one of them: the charts here run from 14% under the gun to 43% on the button. If your own number is well above 35%, the leak is almost never the button, it is the early seats and the calls you make out of the small blind.
Where do these ranges come from?
They are simplified from published poker literature on position and starting-hand selection, then rounded into charts a person can use in real time. We label them simplified on purpose. Two good sources will disagree about K9s under the gun, and no chart is exactly right for every game. What every source does agree on is the shape: tightest under the gun, widest on the button, tighter still at a full ring table, and adjust when the table gives you a reason.