
Poker opening ranges by position
Updated October 10, 2026 By Poker Skill How we built these opening ranges
| A | K | Q | J | T | 9 | 8 | 7 | 6 | 5 | 4 | 3 | 2 | |
|---|---|---|---|---|---|---|---|---|---|---|---|---|---|
| A | AA defend | AKs defend | AQs defend | AJs defend | ATs defend | A9s defend | A8s defend | A7s defend | A6s defend | A5s defend | A4s defend | A3s defend | A2s defend |
| K | AKo defend | KK defend | KQs defend | KJs defend | KTs defend | K9s defend | K8s defend | K7s defend | K6s defend | K5s defend | K4s defend | K3s defend | K2s defend |
| Q | AQo defend | KQo defend | QQ defend | QJs defend | QTs defend | Q9s defend | Q8s defend | Q7s defend | Q6s defend | Q5s defend | Q4s defend | Q3s defend | Q2s defend |
| J | AJo defend | KJo defend | QJo defend | JJ defend | JTs defend | J9s defend | J8s defend | J7s defend | J6s defend | J5s defend | J4s defend | J3s fold | J2s fold |
| T | ATo defend | KTo defend | QTo defend | JTo defend | TT defend | T9s defend | T8s defend | T7s defend | T6s defend | T5s fold | T4s fold | T3s fold | T2s fold |
| 9 | A9o defend | K9o defend | Q9o defend | J9o defend | T9o defend | 99 defend | 98s defend | 97s defend | 96s defend | 95s defend | 94s fold | 93s fold | 92s fold |
| 8 | A8o defend | K8o defend | Q8o defend | J8o defend | T8o defend | 98o defend | 88 defend | 87s defend | 86s defend | 85s defend | 84s fold | 83s fold | 82s fold |
| 7 | A7o defend | K7o defend | Q7o fold | J7o fold | T7o fold | 97o defend | 87o defend | 77 defend | 76s defend | 75s defend | 74s defend | 73s fold | 72s fold |
| 6 | A6o defend | K6o defend | Q6o fold | J6o fold | T6o fold | 96o fold | 86o fold | 76o fold | 66 defend | 65s defend | 64s defend | 63s fold | 62s fold |
| 5 | A5o defend | K5o defend | Q5o fold | J5o fold | T5o fold | 95o fold | 85o fold | 75o fold | 65o fold | 55 defend | 54s defend | 53s defend | 52s fold |
| 4 | A4o defend | K4o fold | Q4o fold | J4o fold | T4o fold | 94o fold | 84o fold | 74o fold | 64o fold | 54o fold | 44 defend | 43s fold | 42s fold |
| 3 | A3o defend | K3o fold | Q3o fold | J3o fold | T3o fold | 93o fold | 83o fold | 73o fold | 63o fold | 53o fold | 43o fold | 33 defend | 32s fold |
| 2 | A2o defend | K2o fold | Q2o fold | J2o fold | T2o fold | 92o fold | 82o fold | 72o fold | 62o fold | 52o fold | 42o fold | 32o fold | 22 defend |
- Defend
- Fold
- 52.3% of hands defended
- 22+
- 22 and every pair above it
- ATs+
- ATs and every suited ace with a higher kicker, up to AKs
- A5s-A2s
- every hand from A5s down to A2s
- s, o
- suited, offsuit
6-max defending range: big blind versus a button raise
52.3% of hands defended
6-max cash game, about 100 big blinds deep, facing a button raise.
Defend (52.3% of hands): 22+, A2s+, K2s+, Q2s+, J4s+, T6s+, 95s+, 85s+, 74s+, 64s+, 53s+, A2o+, K5o+, Q8o+, J8o+, T8o+, 97o+, 87o
Fold: everything else
Get the charts
Free. No email or account needed.
Drill these opening ranges in the app
Poker Skill turns these opening ranges into short daily reps and tells you why an answer was right. Free forever, no wagering.
An opening range is the set of starting hands you raise with from one seat when nobody has entered the pot yet, and it changes seat by seat because the number of players left to act changes. Below is one chart for every position at the table, from under the gun through the big blind, each with the hands, the share of hands it plays and a printable download. If you want the concept first, how poker ranges work covers it.
One PDF holds all seven charts, one position to a page, at a size that survives a printer. Each chart below also downloads on its own.
How much one seat is worth
This is the page's whole thesis in one picture. Same deck, same player, seven seats: the share of hands each one opens with, drawn to scale. Every percentage below is computed from the same range string the seat's own grid renders, so the ladder and the charts cannot disagree.
Under the gun opens 14.3% of hands and the button opens 43.3%, which is roughly three times as many, because acting last for the rest of the hand is worth that much. The big blind's row is a defending range rather than an opening one, so it is the widest number on the page for a different reason: that seat is already invested and getting a price.
Email me the opening ranges pack
We will email you this pack. Confirm in that email to also get occasional poker study tips. One click unsubscribes, any time.
Under the gun (UTG) opening range
| A | K | Q | J | T | 9 | 8 | 7 | 6 | 5 | 4 | 3 | 2 | |
|---|---|---|---|---|---|---|---|---|---|---|---|---|---|
| A | AA raise | AKs raise | AQs raise | AJs raise | ATs raise | A9s fold | A8s fold | A7s fold | A6s fold | A5s raise | A4s raise | A3s raise | A2s raise |
| K | AKo raise | KK raise | KQs raise | KJs raise | KTs raise | K9s fold | K8s fold | K7s fold | K6s fold | K5s fold | K4s fold | K3s fold | K2s fold |
| Q | AQo raise | KQo raise | QQ raise | QJs raise | QTs raise | Q9s fold | Q8s fold | Q7s fold | Q6s fold | Q5s fold | Q4s fold | Q3s fold | Q2s fold |
| J | AJo raise | KJo fold | QJo fold | JJ raise | JTs raise | J9s fold | J8s fold | J7s fold | J6s fold | J5s fold | J4s fold | J3s fold | J2s fold |
| T | ATo fold | KTo fold | QTo fold | JTo fold | TT raise | T9s raise | T8s fold | T7s fold | T6s fold | T5s fold | T4s fold | T3s fold | T2s fold |
| 9 | A9o fold | K9o fold | Q9o fold | J9o fold | T9o fold | 99 raise | 98s raise | 97s fold | 96s fold | 95s fold | 94s fold | 93s fold | 92s fold |
| 8 | A8o fold | K8o fold | Q8o fold | J8o fold | T8o fold | 98o fold | 88 raise | 87s fold | 86s fold | 85s fold | 84s fold | 83s fold | 82s fold |
| 7 | A7o fold | K7o fold | Q7o fold | J7o fold | T7o fold | 97o fold | 87o fold | 77 raise | 76s fold | 75s fold | 74s fold | 73s fold | 72s fold |
| 6 | A6o fold | K6o fold | Q6o fold | J6o fold | T6o fold | 96o fold | 86o fold | 76o fold | 66 raise | 65s fold | 64s fold | 63s fold | 62s fold |
| 5 | A5o fold | K5o fold | Q5o fold | J5o fold | T5o fold | 95o fold | 85o fold | 75o fold | 65o fold | 55 raise | 54s fold | 53s fold | 52s fold |
| 4 | A4o fold | K4o fold | Q4o fold | J4o fold | T4o fold | 94o fold | 84o fold | 74o fold | 64o fold | 54o fold | 44 raise | 43s fold | 42s fold |
| 3 | A3o fold | K3o fold | Q3o fold | J3o fold | T3o fold | 93o fold | 83o fold | 73o fold | 63o fold | 53o fold | 43o fold | 33 raise | 32s fold |
| 2 | A2o fold | K2o fold | Q2o fold | J2o fold | T2o fold | 92o fold | 82o fold | 72o fold | 62o fold | 52o fold | 42o fold | 32o fold | 22 raise |
- Raise
- Fold
- 14.3% of hands
Raise (14.3% of hands): 22+, ATs+, A5s-A2s, KTs+, QTs+, JTs, T9s, 98s, AJo+, KQo
Fold: everything else
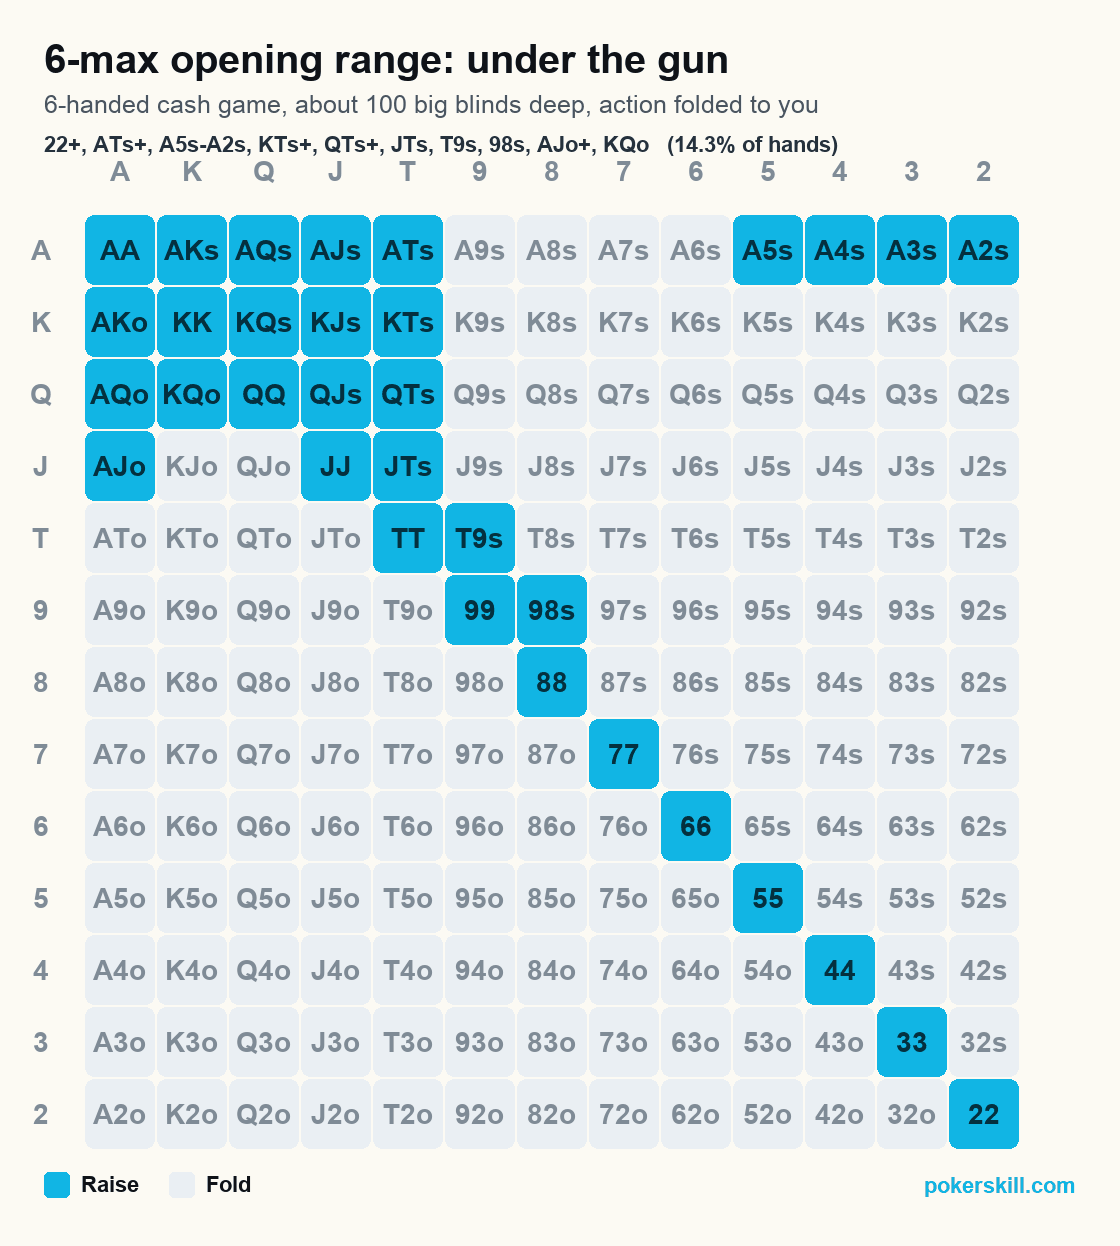
Five players still get to act behind you, and that is the whole reason this is the tightest chart in the set at 14.3% of hands. Every hand you raise here has to survive five chances of running into something better. Most players get the suited aces on the top row backwards: they raise A9s and fold A5s, while this chart does the opposite. Those small suited aces make nut flushes and wheel straights, and they hold an ace that blocks the hands most likely to play back at you. If the seat name is new, UTG has the entry. Every chart on this page assumes about 100 big blinds; at 10 the raise stops being a raise, and the 10 big blind shove chart is what replaces this one.
Middle position (MP) opening range
| A | K | Q | J | T | 9 | 8 | 7 | 6 | 5 | 4 | 3 | 2 | |
|---|---|---|---|---|---|---|---|---|---|---|---|---|---|
| A | AA raise | AKs raise | AQs raise | AJs raise | ATs raise | A9s raise | A8s fold | A7s fold | A6s fold | A5s raise | A4s raise | A3s raise | A2s raise |
| K | AKo raise | KK raise | KQs raise | KJs raise | KTs raise | K9s fold | K8s fold | K7s fold | K6s fold | K5s fold | K4s fold | K3s fold | K2s fold |
| Q | AQo raise | KQo raise | QQ raise | QJs raise | QTs raise | Q9s fold | Q8s fold | Q7s fold | Q6s fold | Q5s fold | Q4s fold | Q3s fold | Q2s fold |
| J | AJo raise | KJo raise | QJo fold | JJ raise | JTs raise | J9s fold | J8s fold | J7s fold | J6s fold | J5s fold | J4s fold | J3s fold | J2s fold |
| T | ATo raise | KTo fold | QTo fold | JTo fold | TT raise | T9s raise | T8s fold | T7s fold | T6s fold | T5s fold | T4s fold | T3s fold | T2s fold |
| 9 | A9o fold | K9o fold | Q9o fold | J9o fold | T9o fold | 99 raise | 98s fold | 97s fold | 96s fold | 95s fold | 94s fold | 93s fold | 92s fold |
| 8 | A8o fold | K8o fold | Q8o fold | J8o fold | T8o fold | 98o fold | 88 raise | 87s fold | 86s fold | 85s fold | 84s fold | 83s fold | 82s fold |
| 7 | A7o fold | K7o fold | Q7o fold | J7o fold | T7o fold | 97o fold | 87o fold | 77 raise | 76s fold | 75s fold | 74s fold | 73s fold | 72s fold |
| 6 | A6o fold | K6o fold | Q6o fold | J6o fold | T6o fold | 96o fold | 86o fold | 76o fold | 66 raise | 65s fold | 64s fold | 63s fold | 62s fold |
| 5 | A5o fold | K5o fold | Q5o fold | J5o fold | T5o fold | 95o fold | 85o fold | 75o fold | 65o fold | 55 raise | 54s fold | 53s fold | 52s fold |
| 4 | A4o fold | K4o fold | Q4o fold | J4o fold | T4o fold | 94o fold | 84o fold | 74o fold | 64o fold | 54o fold | 44 fold | 43s fold | 42s fold |
| 3 | A3o fold | K3o fold | Q3o fold | J3o fold | T3o fold | 93o fold | 83o fold | 73o fold | 63o fold | 53o fold | 43o fold | 33 fold | 32s fold |
| 2 | A2o fold | K2o fold | Q2o fold | J2o fold | T2o fold | 92o fold | 82o fold | 72o fold | 62o fold | 52o fold | 42o fold | 32o fold | 22 fold |
- Raise
- Fold
- 14.8% of hands
Raise (14.8% of hands): 55+, A9s+, A5s-A2s, KTs+, QTs+, JTs, T9s, ATo+, KJo+
Fold: everything else
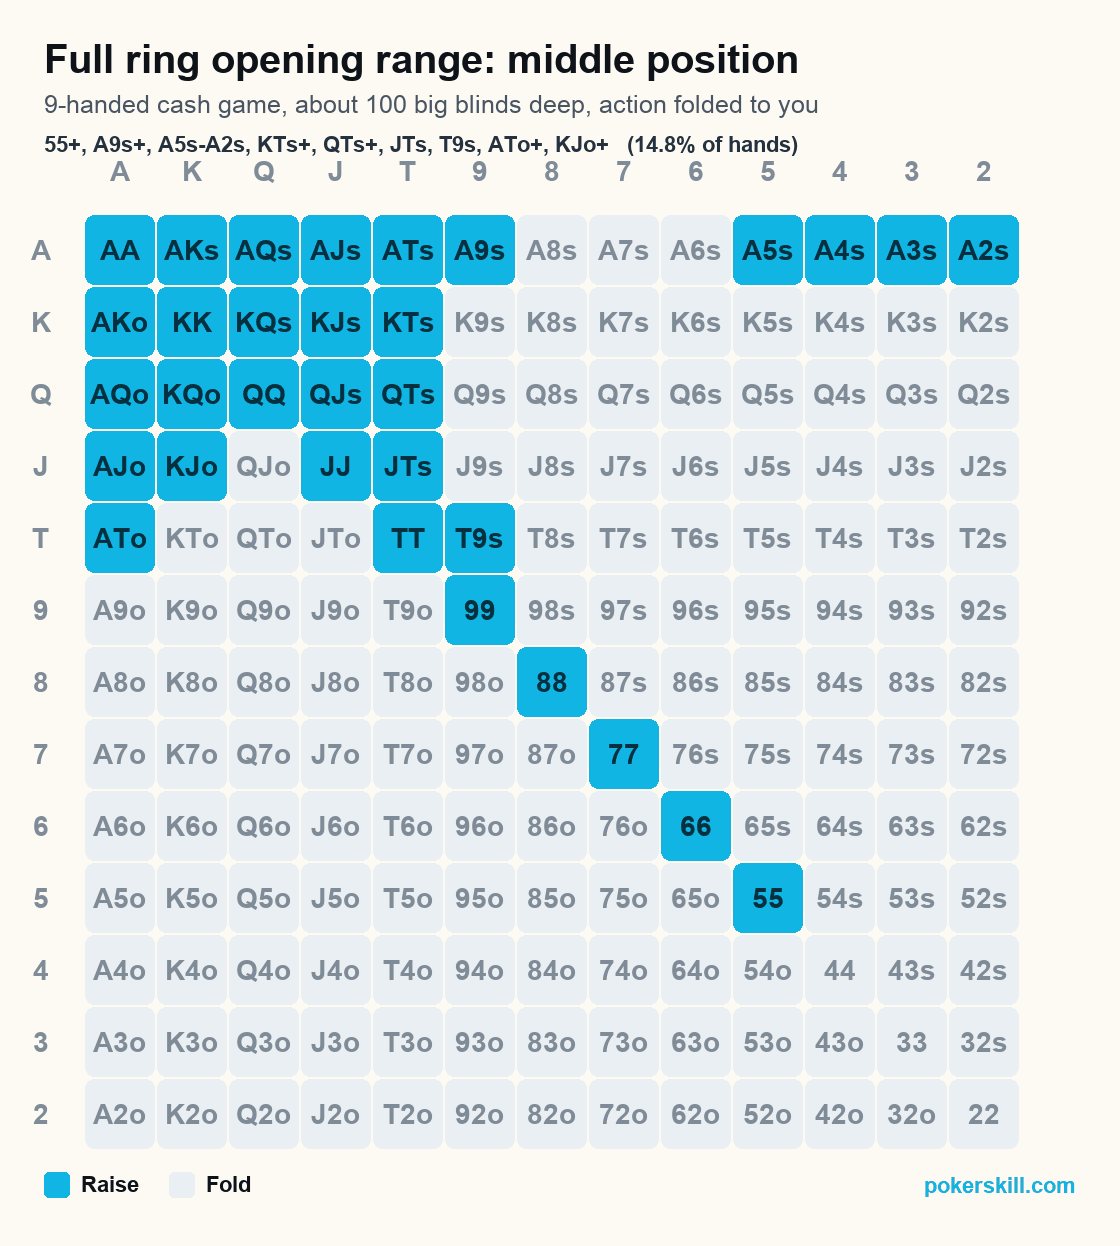
This is the middle-position chart from a 9-handed table, 14.8% of hands, and it sits between the early seats and the hijack in width. Its pairs start at fives and its offsuit broadways at ATo and KJo. If you play 6-max rather than full ring, read this chart as the step between under the gun and the hijack rather than as a seat you sit in. Do not open it like the cutoff just because the front of the table folded. The handover has a depth rather than a seat: when push/fold starts is the section that names it.
Hijack (HJ) opening range
| A | K | Q | J | T | 9 | 8 | 7 | 6 | 5 | 4 | 3 | 2 | |
|---|---|---|---|---|---|---|---|---|---|---|---|---|---|
| A | AA raise | AKs raise | AQs raise | AJs raise | ATs raise | A9s raise | A8s raise | A7s raise | A6s raise | A5s raise | A4s raise | A3s raise | A2s raise |
| K | AKo raise | KK raise | KQs raise | KJs raise | KTs raise | K9s raise | K8s fold | K7s fold | K6s fold | K5s fold | K4s fold | K3s fold | K2s fold |
| Q | AQo raise | KQo raise | QQ raise | QJs raise | QTs raise | Q9s raise | Q8s fold | Q7s fold | Q6s fold | Q5s fold | Q4s fold | Q3s fold | Q2s fold |
| J | AJo raise | KJo raise | QJo fold | JJ raise | JTs raise | J9s raise | J8s fold | J7s fold | J6s fold | J5s fold | J4s fold | J3s fold | J2s fold |
| T | ATo raise | KTo fold | QTo fold | JTo fold | TT raise | T9s raise | T8s raise | T7s fold | T6s fold | T5s fold | T4s fold | T3s fold | T2s fold |
| 9 | A9o fold | K9o fold | Q9o fold | J9o fold | T9o fold | 99 raise | 98s raise | 97s fold | 96s fold | 95s fold | 94s fold | 93s fold | 92s fold |
| 8 | A8o fold | K8o fold | Q8o fold | J8o fold | T8o fold | 98o fold | 88 raise | 87s raise | 86s fold | 85s fold | 84s fold | 83s fold | 82s fold |
| 7 | A7o fold | K7o fold | Q7o fold | J7o fold | T7o fold | 97o fold | 87o fold | 77 raise | 76s fold | 75s fold | 74s fold | 73s fold | 72s fold |
| 6 | A6o fold | K6o fold | Q6o fold | J6o fold | T6o fold | 96o fold | 86o fold | 76o fold | 66 raise | 65s fold | 64s fold | 63s fold | 62s fold |
| 5 | A5o fold | K5o fold | Q5o fold | J5o fold | T5o fold | 95o fold | 85o fold | 75o fold | 65o fold | 55 raise | 54s fold | 53s fold | 52s fold |
| 4 | A4o fold | K4o fold | Q4o fold | J4o fold | T4o fold | 94o fold | 84o fold | 74o fold | 64o fold | 54o fold | 44 raise | 43s fold | 42s fold |
| 3 | A3o fold | K3o fold | Q3o fold | J3o fold | T3o fold | 93o fold | 83o fold | 73o fold | 63o fold | 53o fold | 43o fold | 33 raise | 32s fold |
| 2 | A2o fold | K2o fold | Q2o fold | J2o fold | T2o fold | 92o fold | 82o fold | 72o fold | 62o fold | 52o fold | 42o fold | 32o fold | 22 raise |
- Raise
- Fold
- 18.9% of hands
Raise (18.9% of hands): 22+, A2s+, K9s+, Q9s+, J9s+, T8s+, 98s, 87s, ATo+, KJo+
Fold: everything else
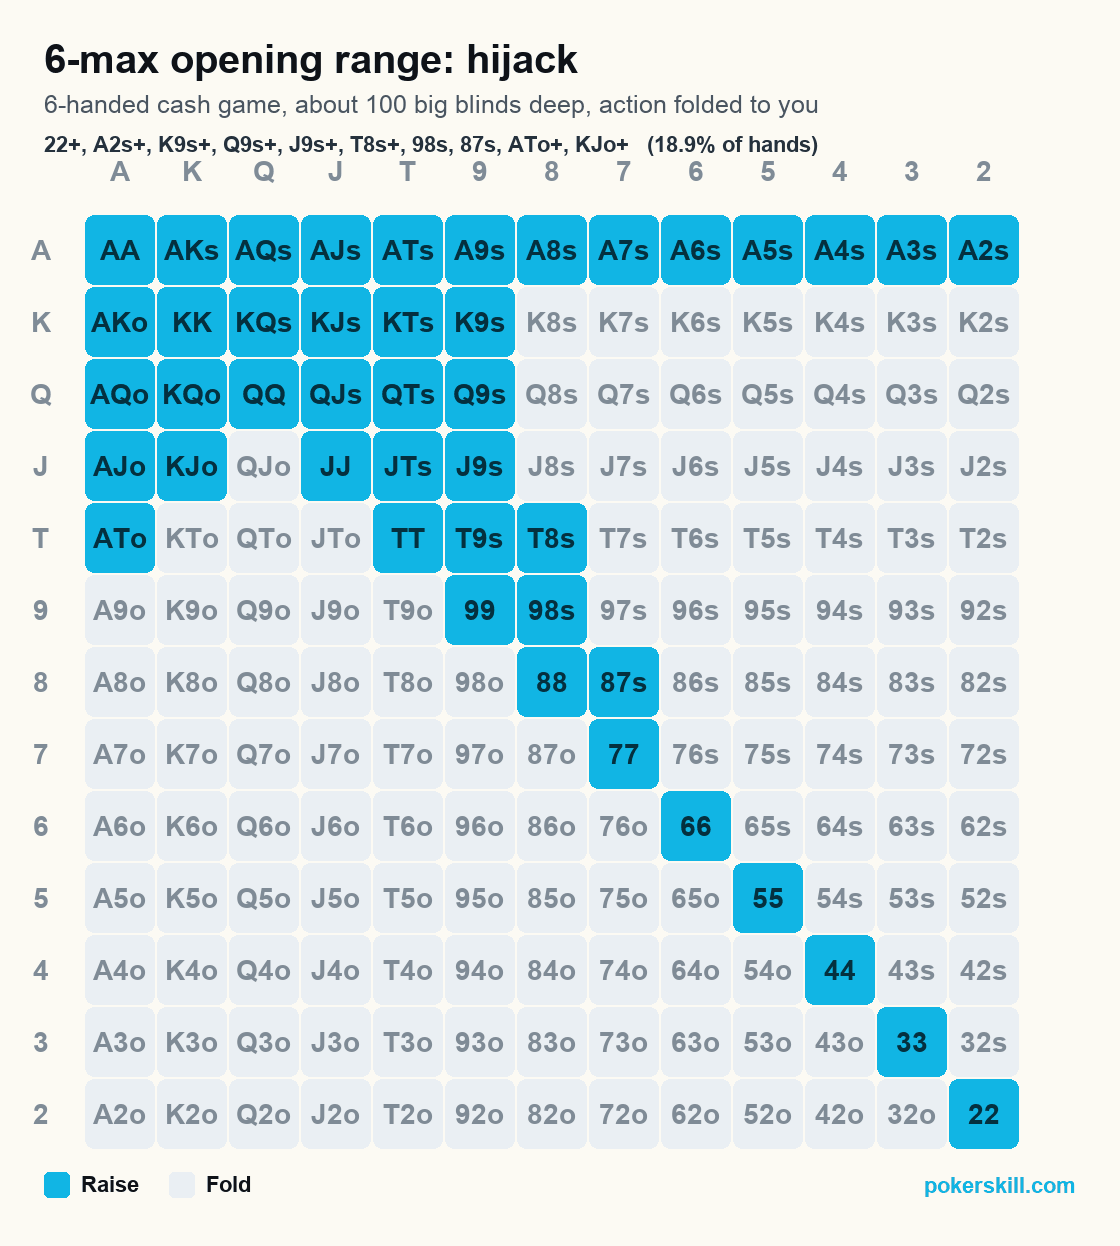
18.9% of hands, and the additions are the ones you would guess: every suited ace, one more step down each suited run (K9s, Q9s, J9s, T8s and 87s) and the two offsuit broadways that were close calls under the gun. One seat later means one fewer player to get through, and that is all the extra room buys. Four players are still behind you and two of them will act after you for the rest of the hand, so playing the hijack like a late seat costs money. The hijack is the only seat in Poker Skill's first-in lesson, and its answers hold the line this chart draws, raising A5s and folding K9o and A2o. At 15 big blinds this seat is shoving rather than opening, and the 15 big blind chart is the one to read.
Cutoff (CO) opening range
| A | K | Q | J | T | 9 | 8 | 7 | 6 | 5 | 4 | 3 | 2 | |
|---|---|---|---|---|---|---|---|---|---|---|---|---|---|
| A | AA raise | AKs raise | AQs raise | AJs raise | ATs raise | A9s raise | A8s raise | A7s raise | A6s raise | A5s raise | A4s raise | A3s raise | A2s raise |
| K | AKo raise | KK raise | KQs raise | KJs raise | KTs raise | K9s raise | K8s raise | K7s raise | K6s raise | K5s raise | K4s fold | K3s fold | K2s fold |
| Q | AQo raise | KQo raise | QQ raise | QJs raise | QTs raise | Q9s raise | Q8s raise | Q7s fold | Q6s fold | Q5s fold | Q4s fold | Q3s fold | Q2s fold |
| J | AJo raise | KJo raise | QJo raise | JJ raise | JTs raise | J9s raise | J8s raise | J7s fold | J6s fold | J5s fold | J4s fold | J3s fold | J2s fold |
| T | ATo raise | KTo raise | QTo fold | JTo fold | TT raise | T9s raise | T8s raise | T7s fold | T6s fold | T5s fold | T4s fold | T3s fold | T2s fold |
| 9 | A9o raise | K9o fold | Q9o fold | J9o fold | T9o fold | 99 raise | 98s raise | 97s raise | 96s fold | 95s fold | 94s fold | 93s fold | 92s fold |
| 8 | A8o raise | K8o fold | Q8o fold | J8o fold | T8o fold | 98o fold | 88 raise | 87s raise | 86s fold | 85s fold | 84s fold | 83s fold | 82s fold |
| 7 | A7o fold | K7o fold | Q7o fold | J7o fold | T7o fold | 97o fold | 87o fold | 77 raise | 76s raise | 75s fold | 74s fold | 73s fold | 72s fold |
| 6 | A6o fold | K6o fold | Q6o fold | J6o fold | T6o fold | 96o fold | 86o fold | 76o fold | 66 raise | 65s raise | 64s fold | 63s fold | 62s fold |
| 5 | A5o fold | K5o fold | Q5o fold | J5o fold | T5o fold | 95o fold | 85o fold | 75o fold | 65o fold | 55 raise | 54s raise | 53s fold | 52s fold |
| 4 | A4o fold | K4o fold | Q4o fold | J4o fold | T4o fold | 94o fold | 84o fold | 74o fold | 64o fold | 54o fold | 44 raise | 43s fold | 42s fold |
| 3 | A3o fold | K3o fold | Q3o fold | J3o fold | T3o fold | 93o fold | 83o fold | 73o fold | 63o fold | 53o fold | 43o fold | 33 raise | 32s fold |
| 2 | A2o fold | K2o fold | Q2o fold | J2o fold | T2o fold | 92o fold | 82o fold | 72o fold | 62o fold | 52o fold | 42o fold | 32o fold | 22 raise |
- Raise
- Fold
- 25.5% of hands
Raise (25.5% of hands): 22+, A2s+, K5s+, Q8s+, J8s+, T8s+, 97s+, 87s, 76s, 65s, 54s, A8o+, KTo+, QJo
Fold: everything else
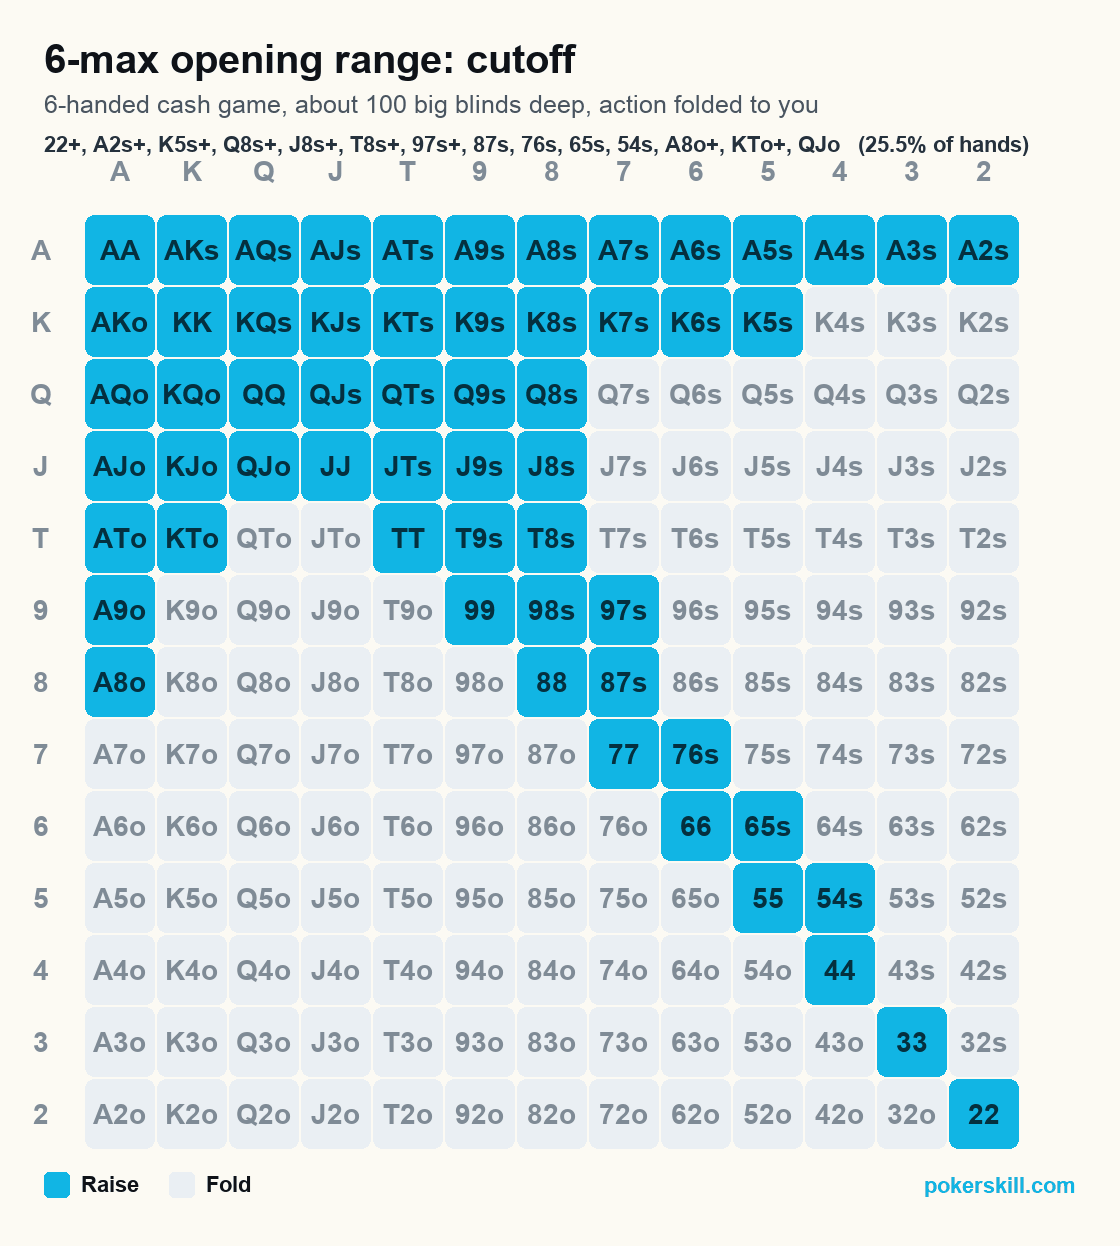
25.5% of hands. Only three players are left and two of them are posting blinds they would rather keep, so this is where stealing becomes a real part of the plan. Suited connectors earn their place here: 54s, 65s and 76s flop the kind of hands nobody puts you on when you took the betting lead. Folding QTs and A8o in the cutoff is the leak to watch, and it comes from learning to fold in the early seats and never stopping. Twenty big blinds is where stealing and shoving overlap, which is what the 20 big blind chart sorts out.
Button (BTN) opening range
| A | K | Q | J | T | 9 | 8 | 7 | 6 | 5 | 4 | 3 | 2 | |
|---|---|---|---|---|---|---|---|---|---|---|---|---|---|
| A | AA raise | AKs raise | AQs raise | AJs raise | ATs raise | A9s raise | A8s raise | A7s raise | A6s raise | A5s raise | A4s raise | A3s raise | A2s raise |
| K | AKo raise | KK raise | KQs raise | KJs raise | KTs raise | K9s raise | K8s raise | K7s raise | K6s raise | K5s raise | K4s raise | K3s raise | K2s raise |
| Q | AQo raise | KQo raise | QQ raise | QJs raise | QTs raise | Q9s raise | Q8s raise | Q7s raise | Q6s raise | Q5s raise | Q4s raise | Q3s fold | Q2s fold |
| J | AJo raise | KJo raise | QJo raise | JJ raise | JTs raise | J9s raise | J8s raise | J7s raise | J6s raise | J5s fold | J4s fold | J3s fold | J2s fold |
| T | ATo raise | KTo raise | QTo raise | JTo raise | TT raise | T9s raise | T8s raise | T7s raise | T6s raise | T5s fold | T4s fold | T3s fold | T2s fold |
| 9 | A9o raise | K9o raise | Q9o raise | J9o raise | T9o raise | 99 raise | 98s raise | 97s raise | 96s raise | 95s raise | 94s fold | 93s fold | 92s fold |
| 8 | A8o raise | K8o raise | Q8o fold | J8o fold | T8o fold | 98o raise | 88 raise | 87s raise | 86s raise | 85s raise | 84s fold | 83s fold | 82s fold |
| 7 | A7o raise | K7o fold | Q7o fold | J7o fold | T7o fold | 97o fold | 87o fold | 77 raise | 76s raise | 75s raise | 74s fold | 73s fold | 72s fold |
| 6 | A6o raise | K6o fold | Q6o fold | J6o fold | T6o fold | 96o fold | 86o fold | 76o fold | 66 raise | 65s raise | 64s raise | 63s fold | 62s fold |
| 5 | A5o raise | K5o fold | Q5o fold | J5o fold | T5o fold | 95o fold | 85o fold | 75o fold | 65o fold | 55 raise | 54s raise | 53s fold | 52s fold |
| 4 | A4o raise | K4o fold | Q4o fold | J4o fold | T4o fold | 94o fold | 84o fold | 74o fold | 64o fold | 54o fold | 44 raise | 43s fold | 42s fold |
| 3 | A3o raise | K3o fold | Q3o fold | J3o fold | T3o fold | 93o fold | 83o fold | 73o fold | 63o fold | 53o fold | 43o fold | 33 raise | 32s fold |
| 2 | A2o raise | K2o fold | Q2o fold | J2o fold | T2o fold | 92o fold | 82o fold | 72o fold | 62o fold | 52o fold | 42o fold | 32o fold | 22 raise |
- Raise
- Fold
- 43.3% of hands
Raise (43.3% of hands): 22+, A2s+, K2s+, Q4s+, J6s+, T6s+, 95s+, 85s+, 75s+, 64s+, 54s, A2o+, K8o+, Q9o+, J9o+, T9o, 98o
Fold: everything else
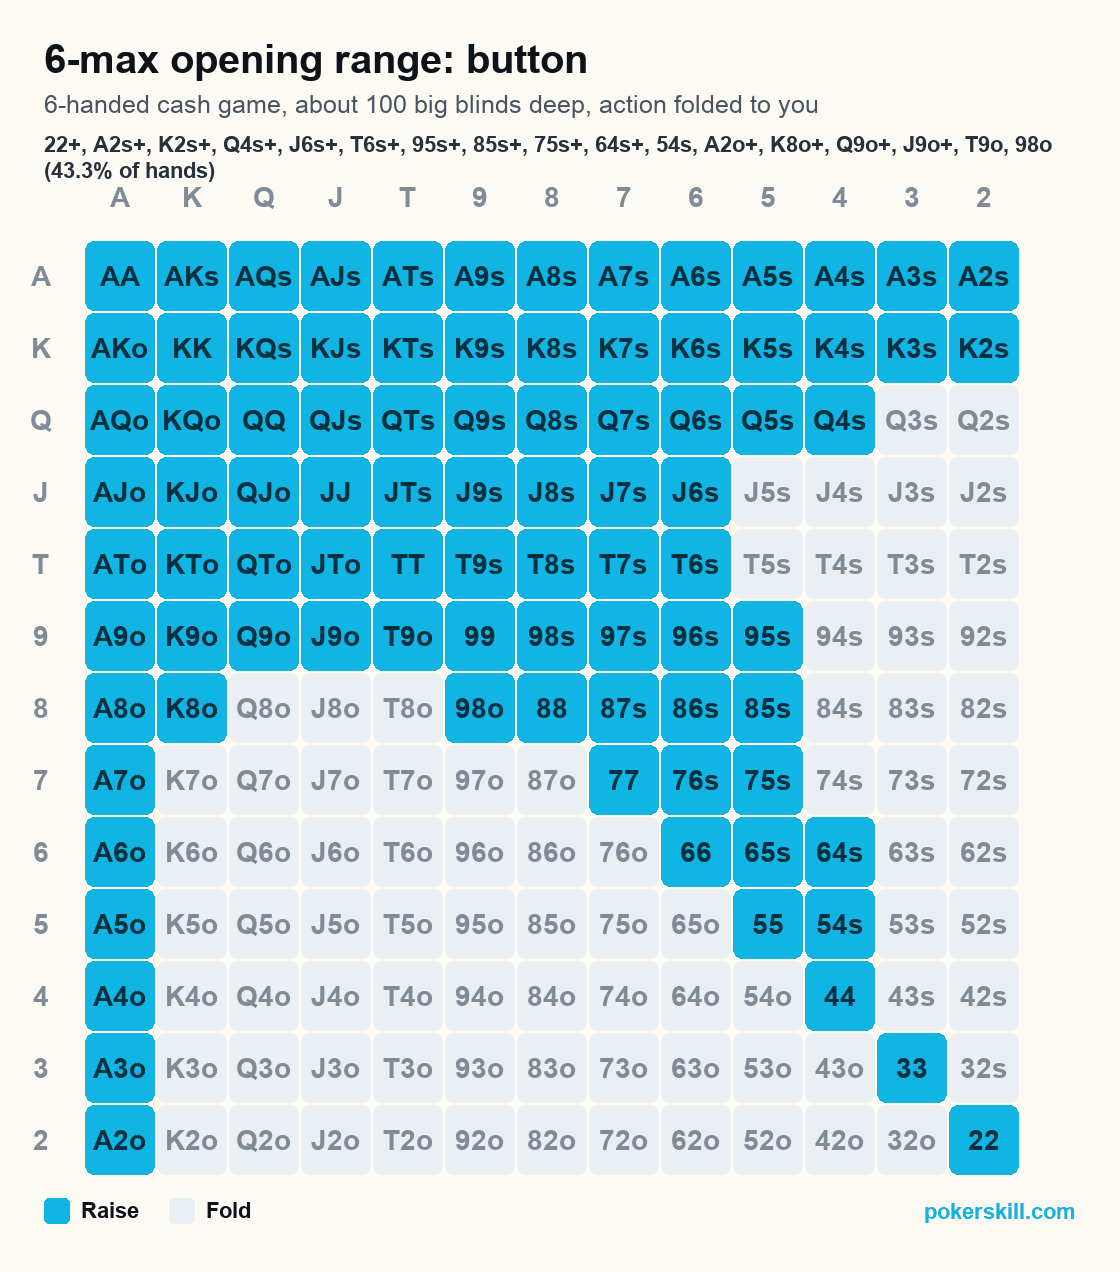
43.3% of hands, the widest opening chart in the set, and position rather than card strength is the reason. You act after both blinds on every street that follows, and only two players stand between you and the pot. The offsuit region under the diagonal opens up further here: A2o, K8o, Q9o and J9o are raises on the button that were quick folds three seats earlier. You raise queen-jack offsuit in Poker Skill's button lesson, a hand the under-the-gun chart folds. Folding too much is the expensive habit in this seat. A folded button is a pot you never contested. It is the second-widest seat when you are short too: the shove width by depth ladder puts only the small blind above it on every row.
Small blind (SB) opening range
| A | K | Q | J | T | 9 | 8 | 7 | 6 | 5 | 4 | 3 | 2 | |
|---|---|---|---|---|---|---|---|---|---|---|---|---|---|
| A | AA raise | AKs raise | AQs raise | AJs raise | ATs raise | A9s raise | A8s raise | A7s raise | A6s raise | A5s raise | A4s raise | A3s raise | A2s raise |
| K | AKo raise | KK raise | KQs raise | KJs raise | KTs raise | K9s raise | K8s raise | K7s raise | K6s raise | K5s raise | K4s raise | K3s fold | K2s fold |
| Q | AQo raise | KQo raise | QQ raise | QJs raise | QTs raise | Q9s raise | Q8s raise | Q7s raise | Q6s raise | Q5s fold | Q4s fold | Q3s fold | Q2s fold |
| J | AJo raise | KJo raise | QJo raise | JJ raise | JTs raise | J9s raise | J8s raise | J7s raise | J6s fold | J5s fold | J4s fold | J3s fold | J2s fold |
| T | ATo raise | KTo raise | QTo raise | JTo raise | TT raise | T9s raise | T8s raise | T7s raise | T6s fold | T5s fold | T4s fold | T3s fold | T2s fold |
| 9 | A9o raise | K9o raise | Q9o fold | J9o fold | T9o fold | 99 raise | 98s raise | 97s raise | 96s raise | 95s fold | 94s fold | 93s fold | 92s fold |
| 8 | A8o raise | K8o fold | Q8o fold | J8o fold | T8o fold | 98o fold | 88 raise | 87s raise | 86s raise | 85s fold | 84s fold | 83s fold | 82s fold |
| 7 | A7o raise | K7o fold | Q7o fold | J7o fold | T7o fold | 97o fold | 87o fold | 77 raise | 76s raise | 75s fold | 74s fold | 73s fold | 72s fold |
| 6 | A6o raise | K6o fold | Q6o fold | J6o fold | T6o fold | 96o fold | 86o fold | 76o fold | 66 raise | 65s raise | 64s fold | 63s fold | 62s fold |
| 5 | A5o raise | K5o fold | Q5o fold | J5o fold | T5o fold | 95o fold | 85o fold | 75o fold | 65o fold | 55 raise | 54s raise | 53s fold | 52s fold |
| 4 | A4o fold | K4o fold | Q4o fold | J4o fold | T4o fold | 94o fold | 84o fold | 74o fold | 64o fold | 54o fold | 44 raise | 43s fold | 42s fold |
| 3 | A3o fold | K3o fold | Q3o fold | J3o fold | T3o fold | 93o fold | 83o fold | 73o fold | 63o fold | 53o fold | 43o fold | 33 raise | 32s fold |
| 2 | A2o fold | K2o fold | Q2o fold | J2o fold | T2o fold | 92o fold | 82o fold | 72o fold | 62o fold | 52o fold | 42o fold | 32o fold | 22 raise |
- Raise
- Fold
- 33.0% of hands
Raise (33.0% of hands): 22+, A2s+, K4s+, Q6s+, J7s+, T7s+, 96s+, 86s+, 76s, 65s, 54s, A5o+, K9o+, QTo+, JTo
Fold: everything else
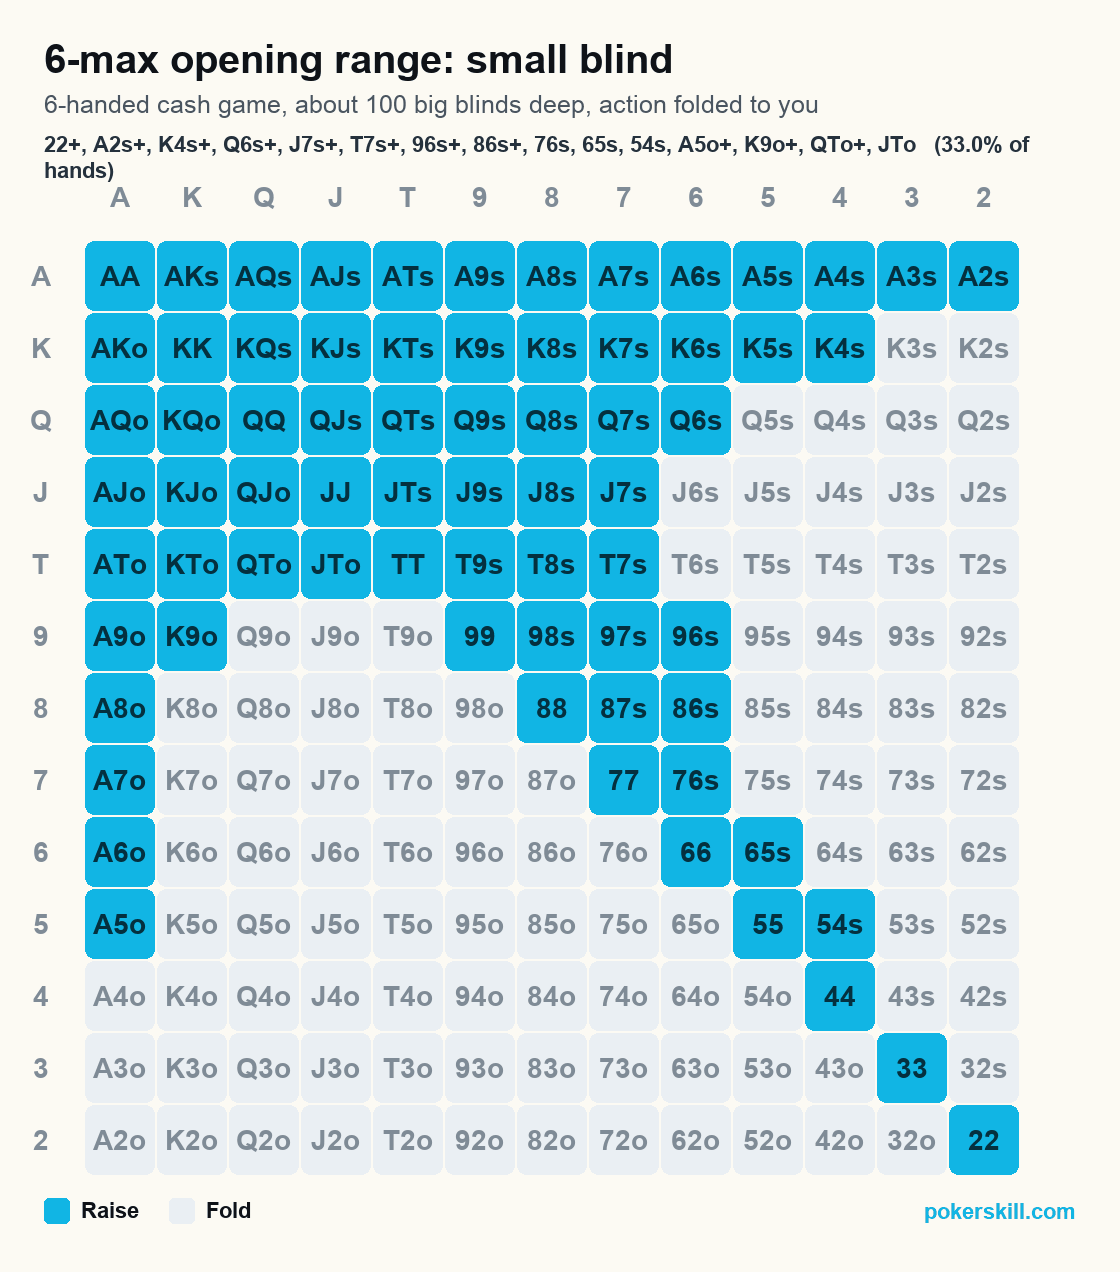
Only the big blind is left, so you get to attack one player, and 33.0% of hands is the chart for it. The catch is that you play every later street out of position, which is why this is tighter than the button and why the usual raise from the small blind is 3 big blinds rather than 2.5. Worth knowing before you print it: poker writers disagree about this seat. Some teach the raise-or-fold chart you see here and others teach a strategy that limps the weaker playable hands. Raise-or-fold is the simpler habit to build. Shorter still and the choice collapses to one move, which is why the small blind is the widest seat on the 5 big blind chart.
Big blind (BB) defending range
| A | K | Q | J | T | 9 | 8 | 7 | 6 | 5 | 4 | 3 | 2 | |
|---|---|---|---|---|---|---|---|---|---|---|---|---|---|
| A | AA defend | AKs defend | AQs defend | AJs defend | ATs defend | A9s defend | A8s defend | A7s defend | A6s defend | A5s defend | A4s defend | A3s defend | A2s defend |
| K | AKo defend | KK defend | KQs defend | KJs defend | KTs defend | K9s defend | K8s defend | K7s defend | K6s defend | K5s defend | K4s defend | K3s defend | K2s defend |
| Q | AQo defend | KQo defend | QQ defend | QJs defend | QTs defend | Q9s defend | Q8s defend | Q7s defend | Q6s defend | Q5s defend | Q4s defend | Q3s defend | Q2s defend |
| J | AJo defend | KJo defend | QJo defend | JJ defend | JTs defend | J9s defend | J8s defend | J7s defend | J6s defend | J5s defend | J4s defend | J3s fold | J2s fold |
| T | ATo defend | KTo defend | QTo defend | JTo defend | TT defend | T9s defend | T8s defend | T7s defend | T6s defend | T5s fold | T4s fold | T3s fold | T2s fold |
| 9 | A9o defend | K9o defend | Q9o defend | J9o defend | T9o defend | 99 defend | 98s defend | 97s defend | 96s defend | 95s defend | 94s fold | 93s fold | 92s fold |
| 8 | A8o defend | K8o defend | Q8o defend | J8o defend | T8o defend | 98o defend | 88 defend | 87s defend | 86s defend | 85s defend | 84s fold | 83s fold | 82s fold |
| 7 | A7o defend | K7o defend | Q7o fold | J7o fold | T7o fold | 97o defend | 87o defend | 77 defend | 76s defend | 75s defend | 74s defend | 73s fold | 72s fold |
| 6 | A6o defend | K6o defend | Q6o fold | J6o fold | T6o fold | 96o fold | 86o fold | 76o fold | 66 defend | 65s defend | 64s defend | 63s fold | 62s fold |
| 5 | A5o defend | K5o defend | Q5o fold | J5o fold | T5o fold | 95o fold | 85o fold | 75o fold | 65o fold | 55 defend | 54s defend | 53s defend | 52s fold |
| 4 | A4o defend | K4o fold | Q4o fold | J4o fold | T4o fold | 94o fold | 84o fold | 74o fold | 64o fold | 54o fold | 44 defend | 43s fold | 42s fold |
| 3 | A3o defend | K3o fold | Q3o fold | J3o fold | T3o fold | 93o fold | 83o fold | 73o fold | 63o fold | 53o fold | 43o fold | 33 defend | 32s fold |
| 2 | A2o defend | K2o fold | Q2o fold | J2o fold | T2o fold | 92o fold | 82o fold | 72o fold | 62o fold | 52o fold | 42o fold | 32o fold | 22 defend |
- Defend
- Fold
- 52.3% of hands defended
Defend (52.3% of hands): 22+, A2s+, K2s+, Q2s+, J4s+, T6s+, 95s+, 85s+, 74s+, 64s+, 53s+, A2o+, K5o+, Q8o+, J8o+, T8o+, 97o+, 87o
Fold: everything else
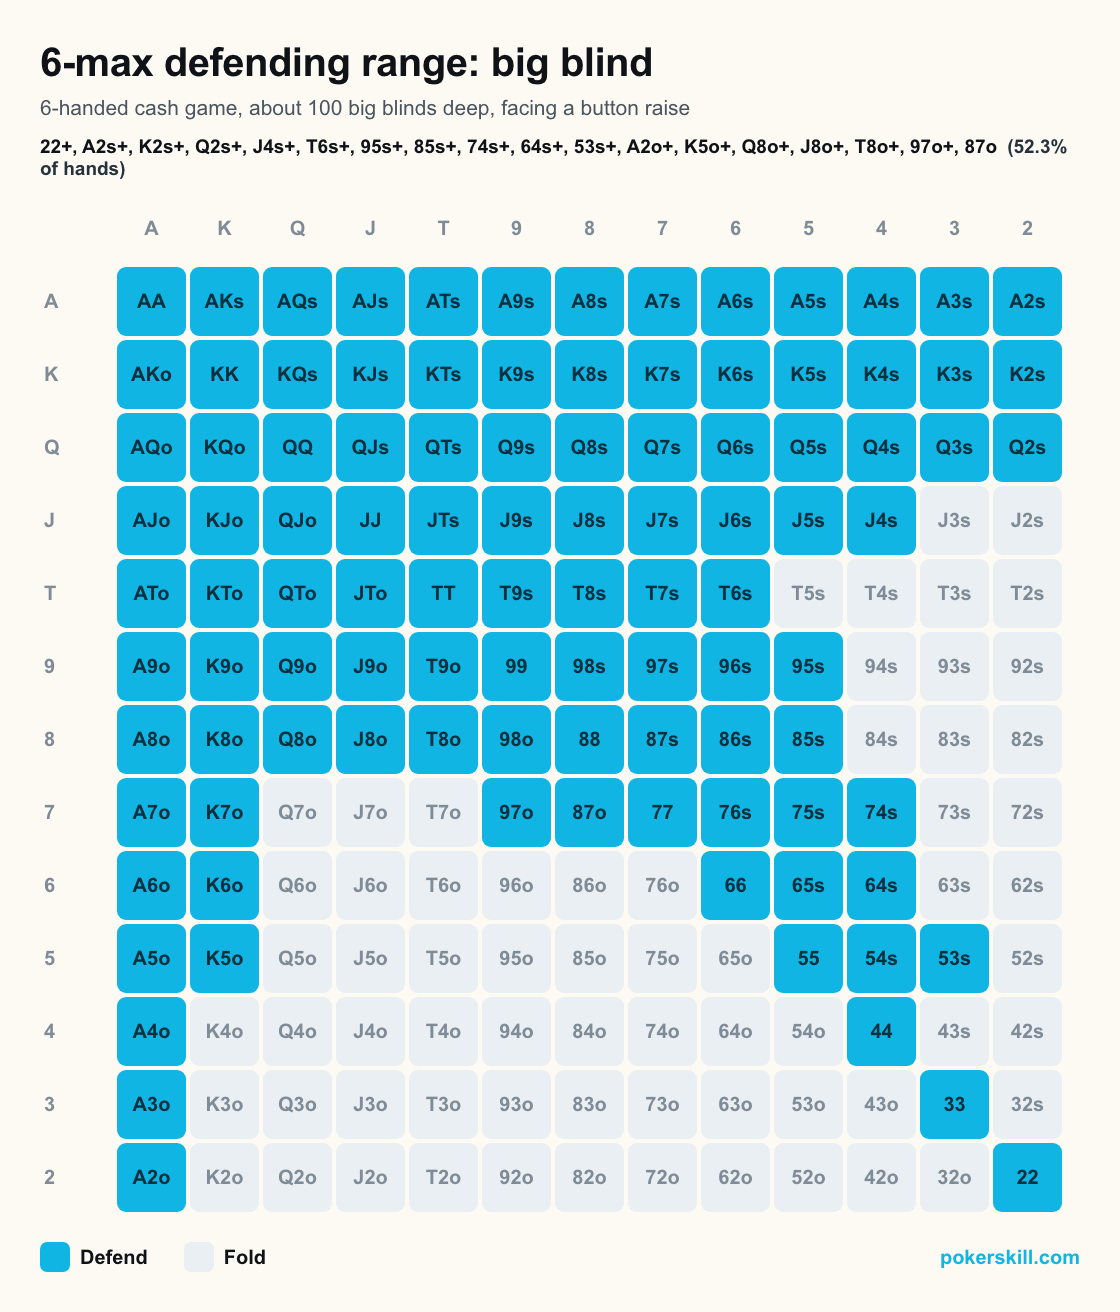
The big blind closes the action before the flop, so it never faces the folded-to-you spot the other six charts cover. Its question is whether to defend against a raise, and this chart answers the most common version. The button raised and everyone else folded. You are getting a better price than any other seat because you already have a big blind in the pot, which is why this chart defends 52.3% of hands.
Scope matters more here than anywhere else on the page. This chart is built for a button open. Against a raise from an early seat, most of the bottom of it is a fold, because the range raising into you is much stronger and the weak offsuit hands stop paying their way. Facing a shove rather than a raise is a different question again, and a tighter one: calling a shove works through it.
How to read a range chart
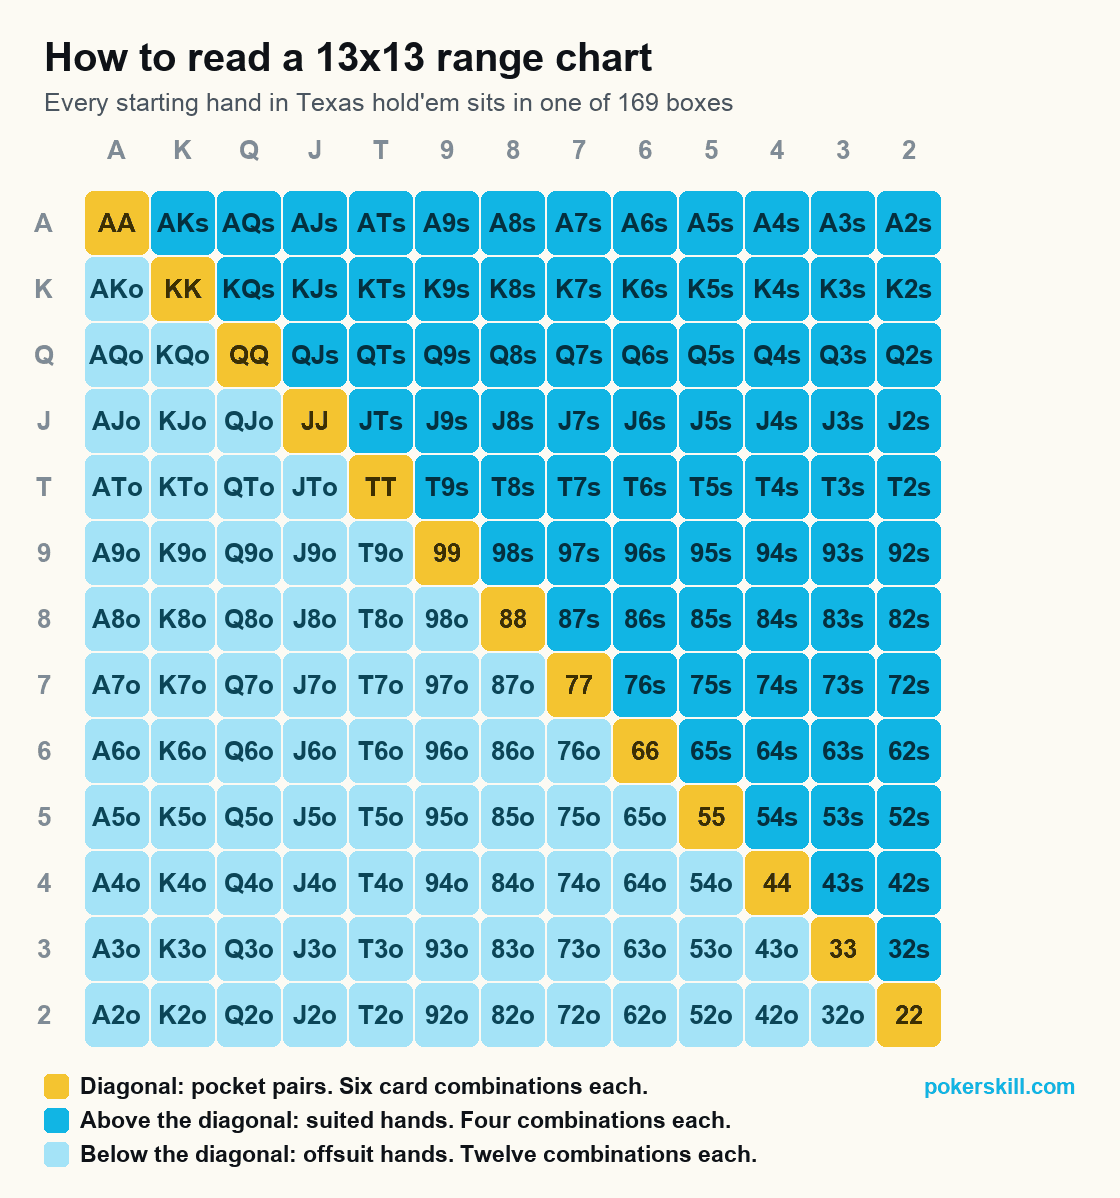
Every chart on this page is the same 13 by 13 grid, and once you can read one you can read all of them. Your two cards live in exactly one box. Pocket pairs run down the diagonal from AA in the top left to 22 in the bottom right. Everything above the diagonal is suited, so AKs sits one box to the right of AA. Everything below it is offsuit, so AKo sits one box underneath. The percentage printed under each chart is not the share of boxes coloured in. It is the share of actual card combinations, and the two differ: each pair is 6 combinations, each suited hand 4 and each offsuit hand 12. A chart can look half full and still play a quarter of your hands.
Adjusting your opening ranges
Every chart here assumes an unopened pot, a table of roughly average players and a raise of about 2.5 big blinds. Change any of those and the chart moves with it.
Tighten when something breaks the assumption: a limper, a short stack behind you looking for a spot, or a table where three people call every raise. Loosen once antes are posted, because there is more dead money to win when everyone folds, and loosen against players who fold to every raise.
When somebody raises before you, these charts stop applying and the decision becomes three-way. Hands that play well as the aggressor go into your 3-bet range, hands that play well after the flop without wanting a bigger pot yet are calls, and the rest fold. The 3-bet range charts draw that decision as its own grids, and the preflop charts PDF covers the spot inside its wider library.
Check yourself. Folded to you in the cutoff at a 6-handed table, 100 big blinds. You look down at Q♣ 8♣. Raise or fold?
Show the answer
Raise. Queen-eight suited is inside this page’s published cutoff opening range, which runs to Q8s and better among the suited queens. Move the same hand two seats earlier and it is a fold: the under-the-gun chart on this page stops at QTs. Nothing about the cards changed, only the number of players left to act.
How we built these opening ranges
Six of the seven are the same grids as the preflop charts, and the big blind chart, against a button raise, is drawn for this page alone. We simplified all seven so every hand gets one action. They are for cash games about 100 big blinds deep, at a 6-max table except middle position, which is for full ring.
Opening ranges FAQ
| Seat | Hands played |
|---|---|
| Under the gun (UTG) | 14.3% |
| Middle position (MP) | 14.8% |
| Hijack (HJ) | 18.9% |
| Cutoff (CO) | 25.5% |
| Button (BTN) | 43.3% |
| Small blind (SB) | 33.0% |
| Big blind (BB) | 52.3% |
What percentage of hands should you open from each position?
The seven charts on this page run from 14.3% of hands under the gun to 43.3% on the button, with the big blind defending 52.3% against a button raise. Every figure is computed from the same range string that draws the chart above it, so the table and the grid cannot disagree.
What is the difference between a range chart and a preflop chart?
A range chart shows one seat's hands as a grid, which is what you want when the question is what to raise from the cutoff. A preflop chart is the wider library: the same opening grids plus what to do when somebody raises in front of you. This page is the first. That one is the second.
Should you always follow the chart?
No, and no chart writer thinks you should. A chart answers one question well: what to do with this hand, from this seat, when the pot is unopened. Everything else before the flop is judgment, and the adjustments above are worth more than any extra chart you could memorise.
Where do these ranges come from?
They are simplified from published poker writing on position and starting-hand selection, then rounded into charts you can use in real time. Six of the seven are the same strings the preflop library publishes. The big blind defending chart is built for a button open around 100 big blinds. Two good sources will disagree about K9s under the gun, and no chart is exactly right for every game.